Effects, Gradients and Animations
This page was contributed by Gail C. Anderson and Paul Anderson under the UPL and is from The Definitive Guide to Modern Java Clients with JavaFX 17 graciously contributed by Apress.Enhancing the MyShapes Application
One of the advantages of JavaFX over older UI toolkits is the ease in which you can apply effects, gradients, and animation to nodes in your scene graph. We will return to the concept of scene graph nodes repeatedly, since that’s how the JavaFX runtime efficiently renders the visual parts of your application.
Let’s apply some modifications to MyShapes now to show you some of these features. Because JavaFX is able to interpolate colors, you can use colors to define gradients. Gradients give depth to a shape and can be either radial or linear. Let’s show you a linear gradient.
Linear Gradient
Linear gradients require two or more colors, called Stops. A gradient stop consists of a color and an offset between 0 and 1. This offset specifies where to place the color along the gradient. The gradient calculates the proportional shading from one color stop to the next.
In our example, we’ll use three color stops: Color.DODGERBLUE, Color.LIGHTBLUE, and Color.GREEN. The first stop will have offset 0, the second offset .5, and the third offset 1.0, as follows:
Stop[] stops = new Stop[] { new Stop(0, Color.DODGERBLUE),
        new Stop(0.5, Color.LIGHTBLUE),
        new Stop(1.0, Color.LIGHTGREEN)};
The LinearGradient constructor specifies the x-axis range followed by the y-axis range. The following linear gradient has a constant x-axis but varies its y-axis. This is called a vertical gradient.
// startX=0, startY=0, endX=0, endY=1
LinearGradient gradient = new LinearGradient(0, 0, 0, 1, true,CycleMethod.NO_CYCLE, stops);
Boolean true indicates the gradient stretches through the shape (where 0 and 1 are proportional to the shape), and NO_CYCLE means the pattern does not repeat. Boolean false indicates the gradient’s x and y values are instead relative to the local coordinate system of the parent.
To make a horizontal gradient, specify a range for the x-axis and make the y-axis constant, as follows:
// startX=0, startY=0, endX=1, endY=0
LinearGradient gradient = new LinearGradient(0, 0, 1, 0, true,CycleMethod.NO_CYCLE, stops);
Other combinations let you specify diagonal gradients or reverse gradients, where colors appear in the opposite order.
DropShadow
Next, let’s add a drop shadow effect to the ellipse. You specify the color of the drop shadow, as well as a radius and x and y offsets. The larger the radius, the larger the shadow. The offsets represent the shadow placement relative to the outer edge of the shape. Here, we specify a radius of 30 pixels with an offset of 10 pixels to the right and below the shape:
ellipse.setEffect(new DropShadow(30, 10, 10, Color.GRAY));
These offsets simulate a light source emanating from the upper left of the scene. When the offsets are 0, the shadow surrounds the entire shape, as if the light source were shining directly above the scene.
Reflection
A reflection effect mirrors a component and fades to transparent, depending on how you configure its top and bottom opacities, fraction, and offset. Let’s add a reflection effect to our Text node. We’ll use .8 for the fraction, so that the reflection will be eight-tenths of the reflected component. The offset specifies how far below the bottom edge the reflection starts in pixels.
We specify 1 pixel (the default is 0). The reflection starts at fully opaque (top opacity) and transitions to fully transparent (bottom opacity) unless you modify the top and bottom opacity values:
Reflection r = new Reflection();
r.setFraction(.8);
r.setTopOffset(1.0);
text.setEffect(r);
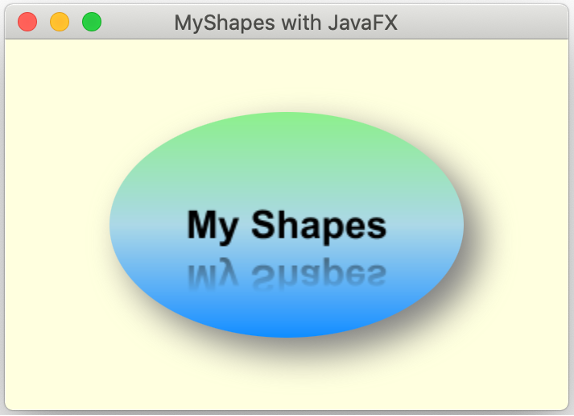
You can observe below the enhanced MyShapes program running in a window. You see the linear gradient fill applied to the ellipse, a drop shadow on the ellipse, and the reflection effect applied to the text.

Configuring Actions
Now it’s time to make our application do something. JavaFX defines various types of standard input events with the mouse, gestures, touch, or keys. These input event types each have specific handlers that process them.
Let’s keep things simple for now. We’ll show you how to write an event handler to process a single mouse click event. We’ll create the handler and attach it to a node in our scene graph. The program’s behavior will vary depending on which node acquires the handler. We can configure the mouse click handler on the text, ellipse, or stack pane node. Here’s the code to add an action event handler to the text node:
text.setOnMouseClicked(mouseEvent -> {
    IO.println(mouseEvent.getSource().getClass() + " clicked.");
});
When the user clicks inside the text, the program displays the line class javafx.scene.text.Text clicked.
If the user clicks in the background area (the stack pane) or inside the ellipse, nothing happens. If we attach the same listener to the ellipse instead of the text, we see the line
class javafx.scene.shape.Ellipse clicked.
Note that because the text object appears in front of the ellipse in the stack pane, clicking the text object does not invoke the event handler. Even though these scene graph nodes appear on top of each other, they are separate nodes in the hierarchy.
That is, one isn’t inside the other; rather, they are both distinct leaf nodes managed by the stack pane. In this case, if you want both nodes to respond to a mouse click, you would attach the mouse event handler to both nodes. Or you could attach just one event handler to the stack pane node. Then, a mouse click anywhere inside the window triggers the handler with the following output line:
class javafx.scene.layout.StackPane clicked.
Let’s do something a bit more exciting and apply an animation to the MyShapes program.
Animation
JavaFX makes animation very easy when you use the built-in transition APIs. Each JavaFX Transition type controls one or more Node (or Shape) properties. For example, the FadeTransition controls a node’s opacity, varying the property over time. To fade something out gradually, you change its opacity from fully opaque (1) to completely transparent (0). The TranslateTransition moves a node by modifying its translateX and translateY properties (or translateZ if you’re working in 3D).
You can play multiple transitions in parallel with a ParallelTransition or sequentially with a SequentialTransition. To control timing between two sequential transitions, use PauseTransition or configure a delay before a transition begins with Transition method setDelay(). You can also define an action when a Transition completes using the Transition action event handler property onFinished.
Transitions begin with method play() or playFromStart(). Method play() starts the transition at its current time; method playFromStart() always begins at time 0. Other methods include stop() and pause(). You can query a transition’s status with getStatus(), which returns one of the Animation.Status enum values: RUNNING, PAUSED, or STOPPED.
All transitions support the common properties duration, autoReverse, cycleCount, onFinished, currentTime, and either node or shape (for Shape-specific transitions).
Let’s define a RotateTransition now for our MyShapes program. The rotation begins when a user clicks inside the window.
public class MyShapes extends Application {
    @Override
    public void start(Stage stage) throws Exception {
         . . .
        // Define RotateTransition
        RotateTransition rotate = new RotateTransition(
                       Duration.millis(2500), stackPane);
        rotate.setToAngle(360);
        rotate.setFromAngle(0);
        rotate.setInterpolator(Interpolator.LINEAR);
        // configure mouse click handler
        stackPane.setOnMouseClicked(mouseEvent -> {
            if (rotate.getStatus().equals(Animation.Status.RUNNING)) {
                rotate.pause();
            } else {
                rotate.play();
            }
        });
        . . .
    }
}
The RotateTransition constructor specifies a duration of 2500 milliseconds and applies the transition to the StackPane node. The rotation animation begins at angle 0 and proceeds linearly to angle 360, providing one full rotation. The animation starts when the user clicks anywhere inside the StackPane layout control.
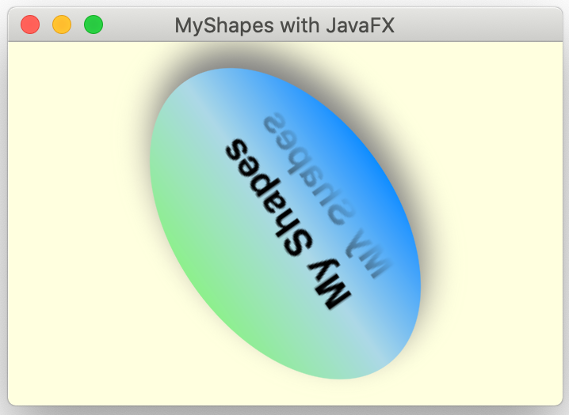
There are a few interesting things to notice in this example. First, because we define the transition on the StackPane node, the rotation applies to all of the StackPane’s children. This means that not only will the Ellipse and Text shapes rotate, but the drop shadow and reflection effects rotate, too.
Second, the event handler checks the transition status. If the animation is in progress (running), the event handler pauses the transition. If it’s not running, it starts it up with play(). Because play() starts at the transition’s current time, a pause() followed by play() resumes the transition where it was paused.
Below you can see the program running during the rotate transition.
Last update: September 12, 2023
