Building a Java application in IntelliJ IDEA
This page was contributed by Marit van Dijk under the UPLOverview
An IDE (Integrated Development Environment) allows you to quickly create applications by combining a source-code editor with the ability to compile and run your code, as well as integration with build, test, and debug tools, version control systems, and so on. Finally, an IDE will let you search and navigate your codebase in ways your file system won't.
One of the most widely used integrated development environments (IDEs) for Java is IntelliJ IDEA. Its user-friendly interface, rich feature set, and vast ecosystem make it an ideal environment for beginners to learn and grow as developers. In this tutorial you'll learn how to use some of its features to simplify your development process and accelerate your learning curve with Java programming.
Installing IntelliJ IDEA
To install IntelliJ IDEA, download it from the IntelliJ IDEA website and follow the instructions.
When you first install IntelliJ IDEA, it will come with a free 30-day trial of the Ultimate subscription. This subscription provides advanced features for professional development, but these are not required for this tutorial. Once the subscription trial ends, IntelliJ IDEA stays fully functional with all the basic features for Java development available.
For more information on installing IntelliJ IDEA on your OS, see the documentation.
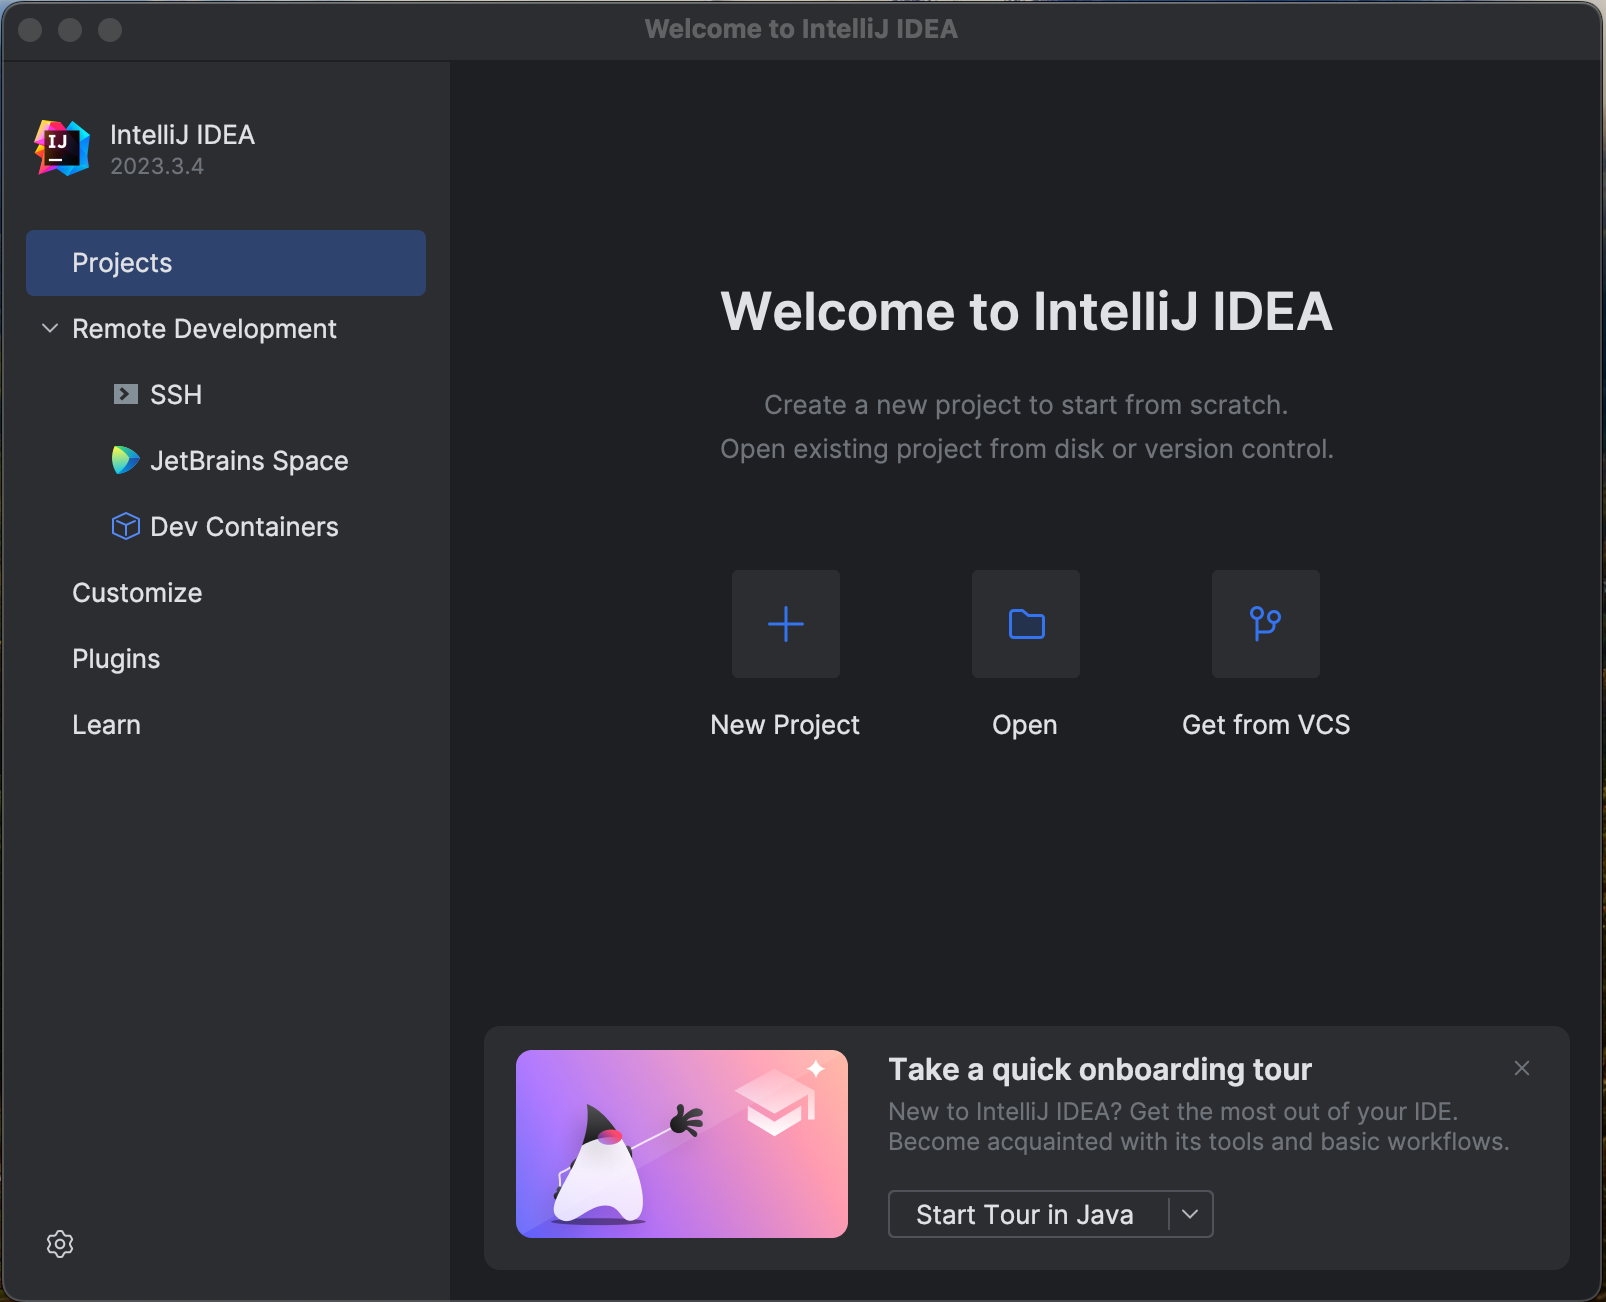
When you launch IntelliJ IDEA for the first time, you'll see the Welcome screen. From here, you can create a new project, open an existing project, or get a project from a version control system (like GitHub).
To start working with Java, you will need to install a JDK. You can do this yourself, as described in Getting Started with Java, or you can do so in IntelliJ IDEA when creating a new project, without having to switch from your IDE and other tools (such as your browser, file system, etc.) to download and configure a JDK.
Creating a new project
You can create a new project from the Welcome screen, or you can go to File | New | Project in the main menu.

In the New Project wizard, make sure that Java is selected on the left-hand side, and give your project a name (for example, java-demo).
Next, we'll select a Build system. IntelliJ IDEA supports both Maven and Gradle; the most used build systems for Java. A build tool, like Maven or Gradle, helps you to build your project and manage any dependencies (like additional libraries) that you want to use in your Java code. Using a build tool will also make it easier to share your application and build it on a different machine. If you don't want to use either, you can use the IntelliJ build system. In this tutorial, let's create a Maven project.
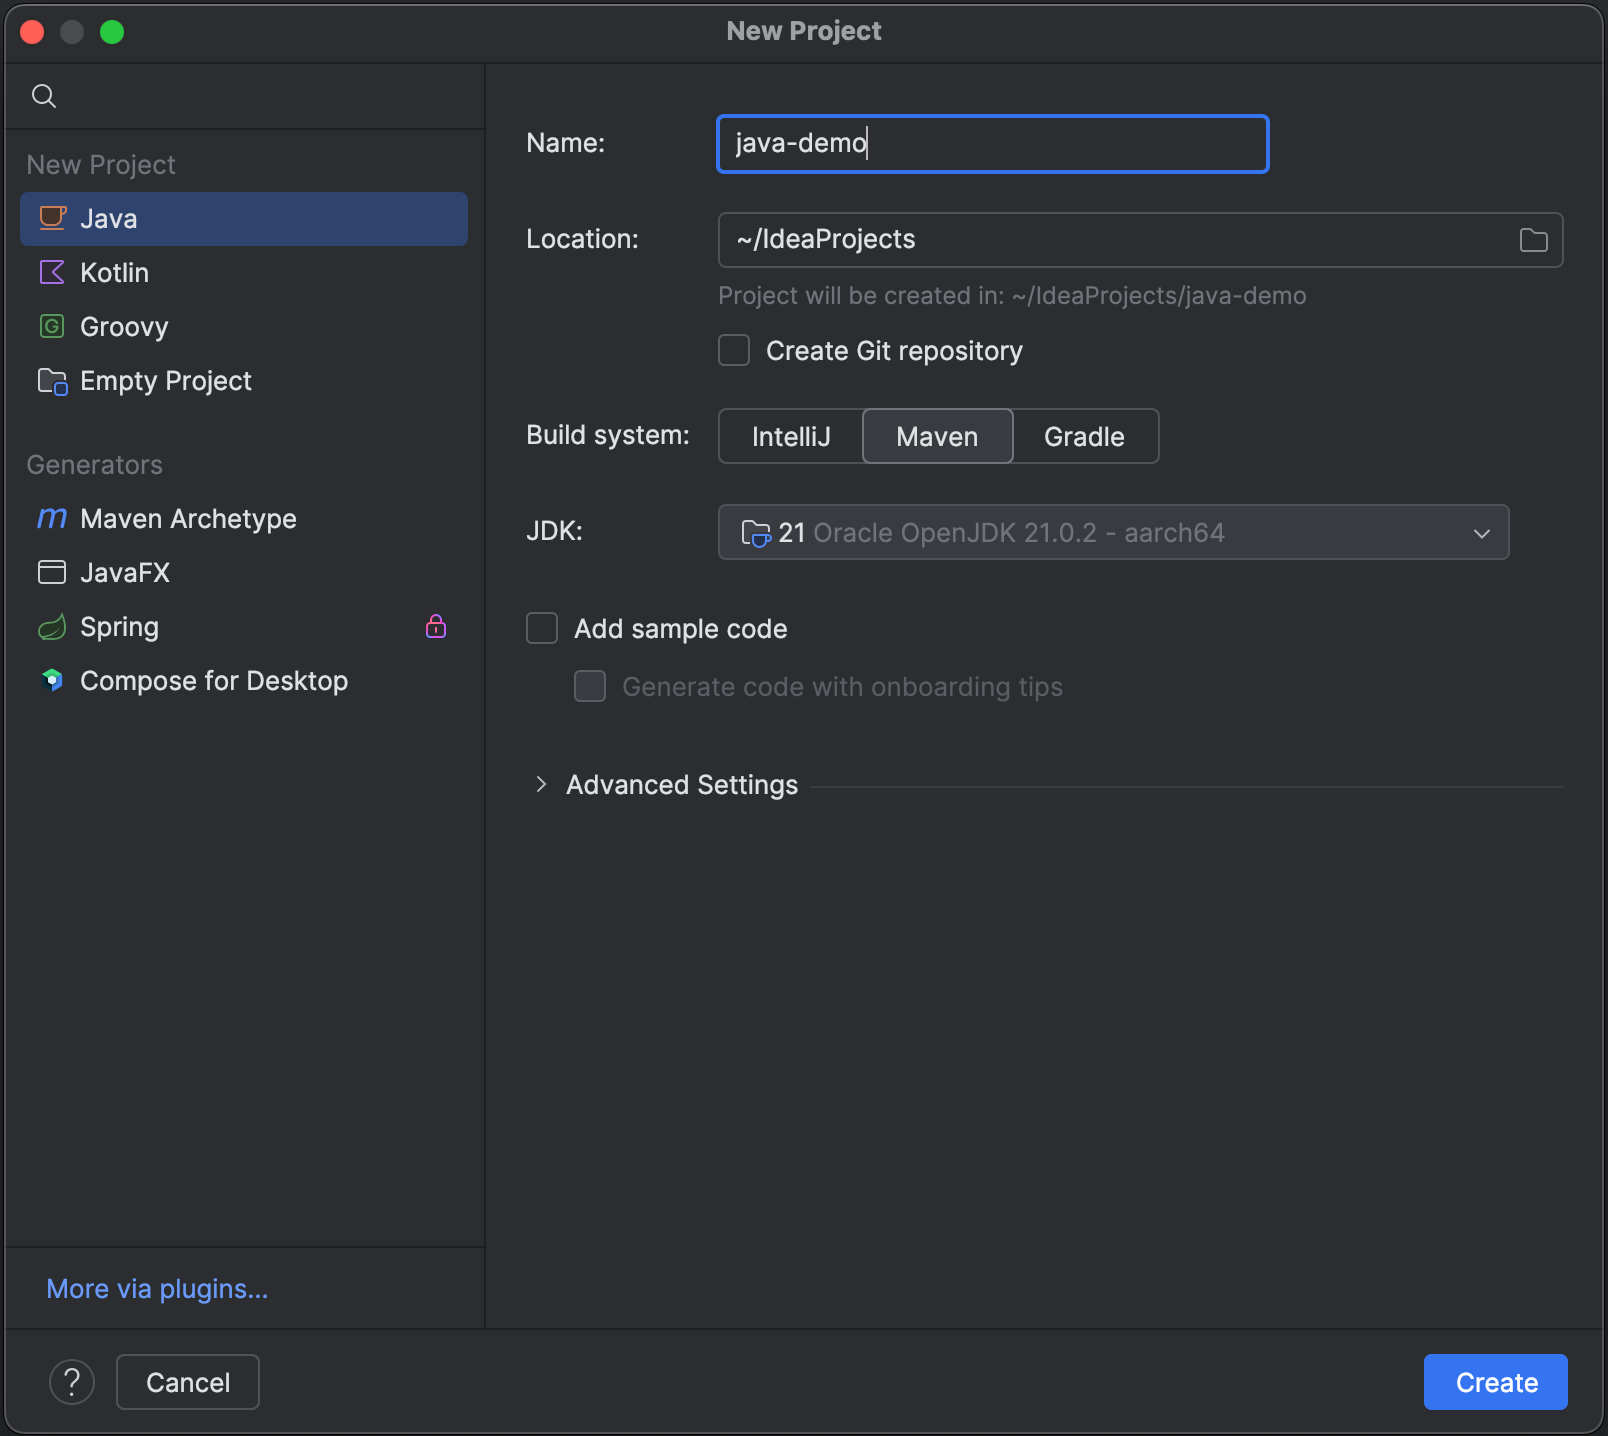
To develop a Java application, you'll need a JDK. If the necessary JDK is already defined in IntelliJ IDEA, select it from the JDK list. This tutorial will use Java 25.
If the JDK is installed on your computer, but not defined in the IDE, select the option Add JDK from the list and specify the path to the JDK home directory (for example, /Library/Java/JavaVirtualMachines/openjdk-25.0.2.jdk).
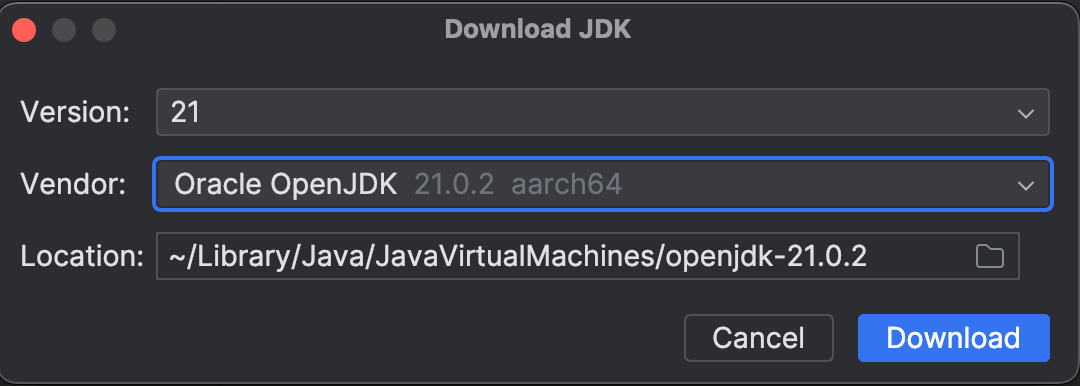
If you don't have the necessary JDK on your computer, select Download JDK. In the Download JDK popup, specify the JDK vendor (for example, Oracle OpenJDK) and version, change the installation path if required, and click Download.
If you select Add sample code, a Main class which prints out “Hello World” will be added to your project. Leave it unchecked, so you can add your own code later.
Once you're satisfied with your input in the New Project popup, click Create.
IntelliJ IDEA will create a project for you. If you selected Maven as your build system, the project will contain a basic pom.xml and a default directory structure for a Maven project with the source folder defined. The pom.xml is a file that contains information about the project and configuration details used by Maven to build the project. For more information, see the Maven documentation.
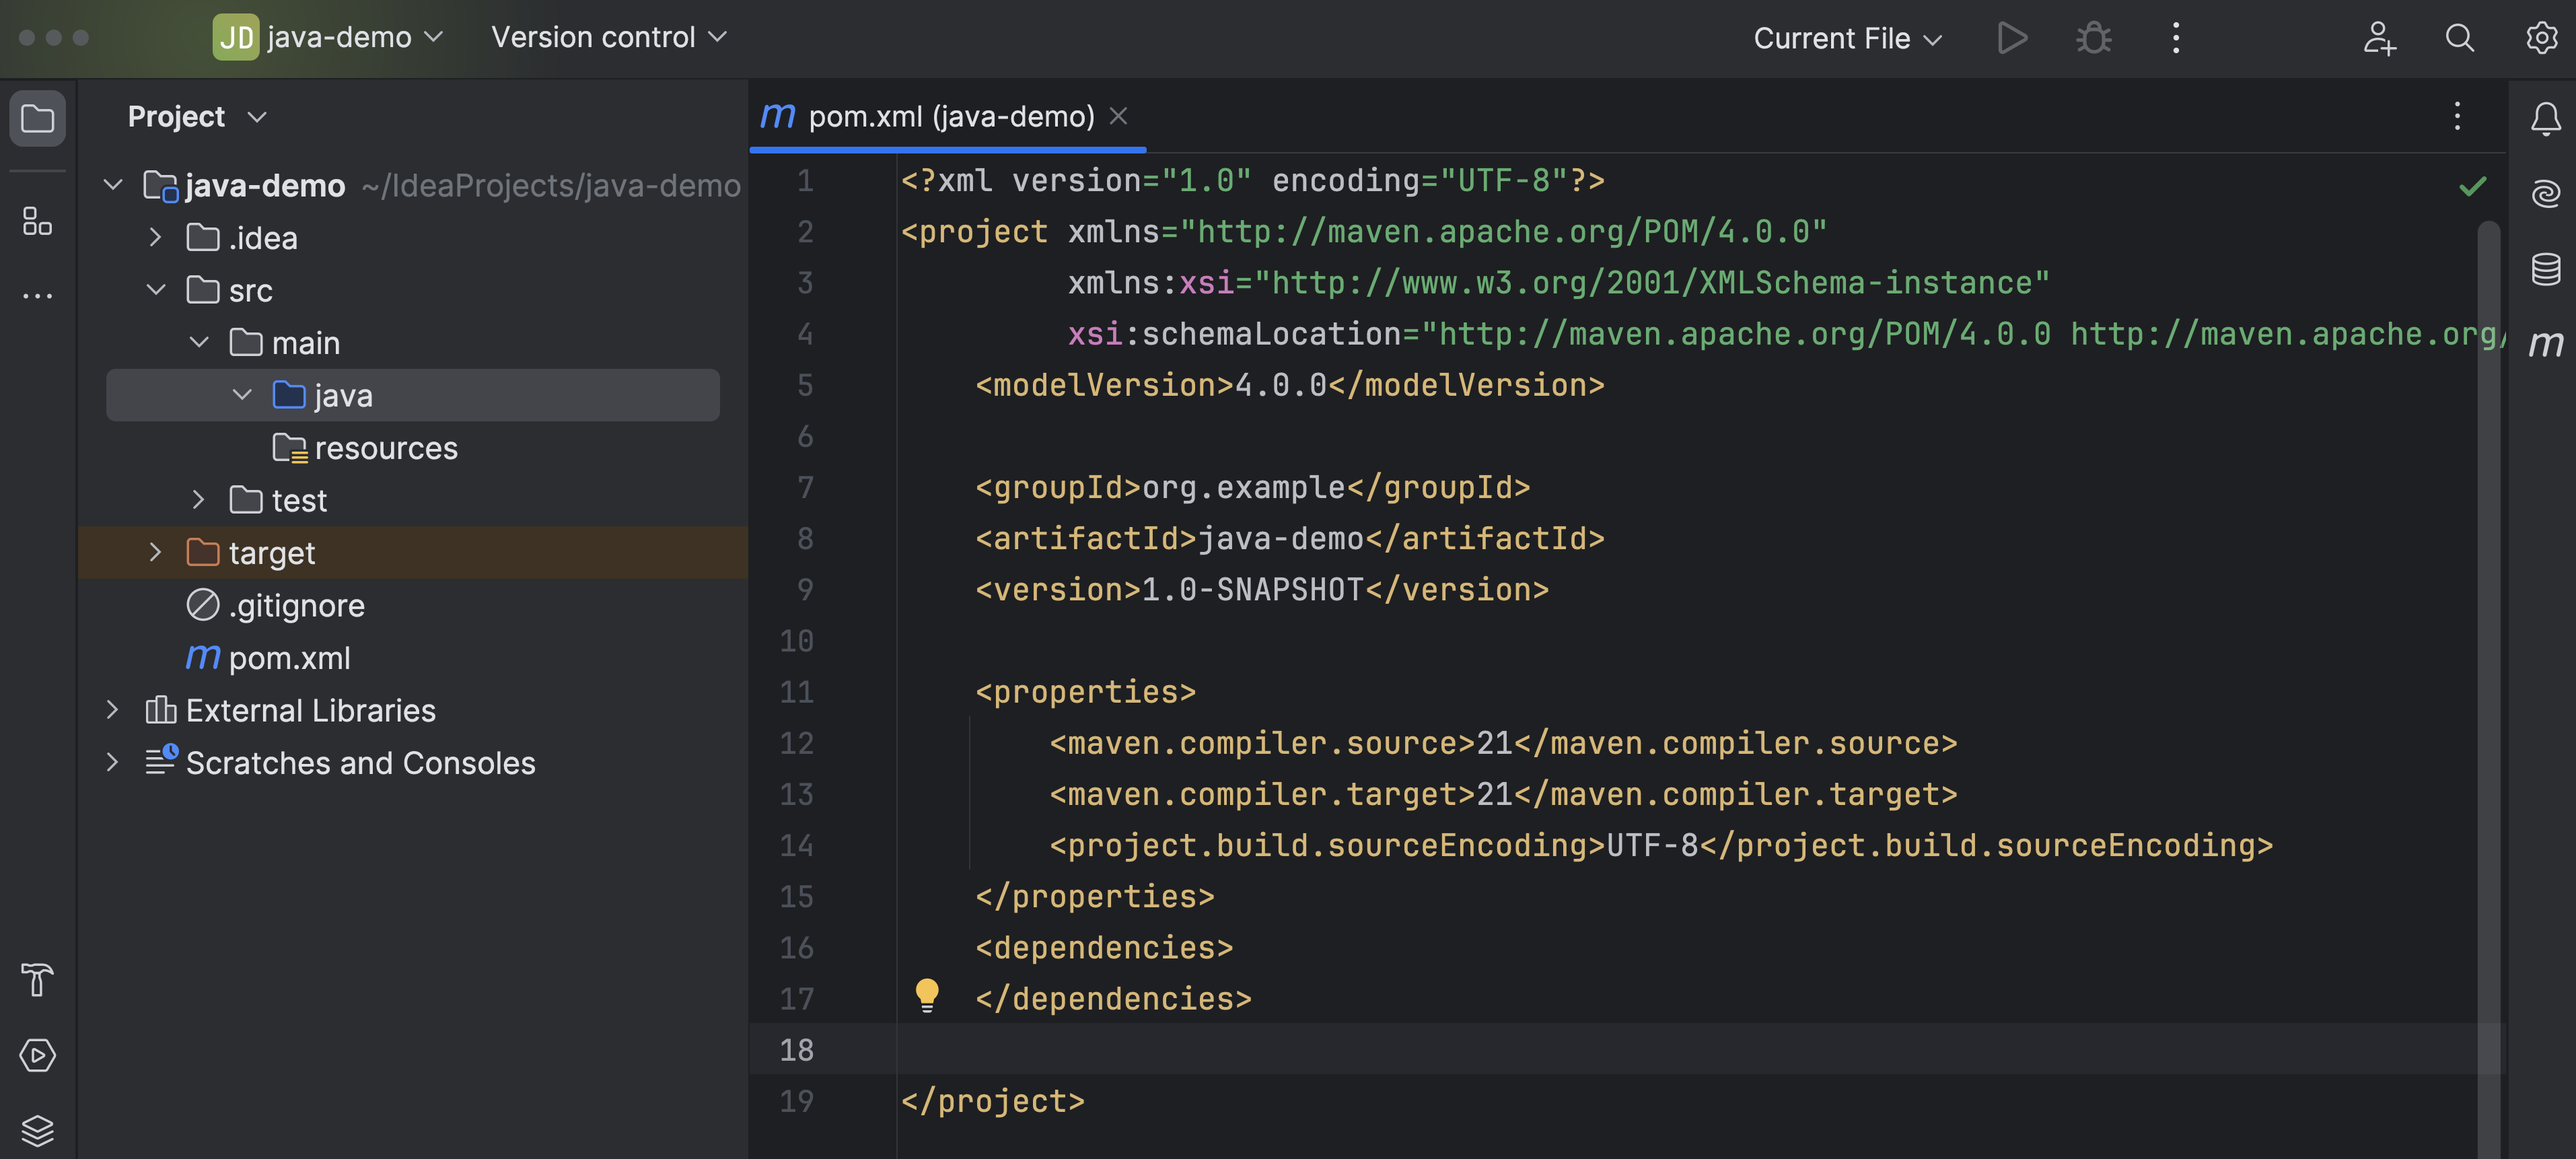
You can see the project structure in the Project tool window on the left. The .idea folder contains your project configuration. The src folder contains your code. When you expand that folder, you'll see that IntelliJ IDEA has created a main folder for your Java code and a test folder for your tests.
Writing and editing code
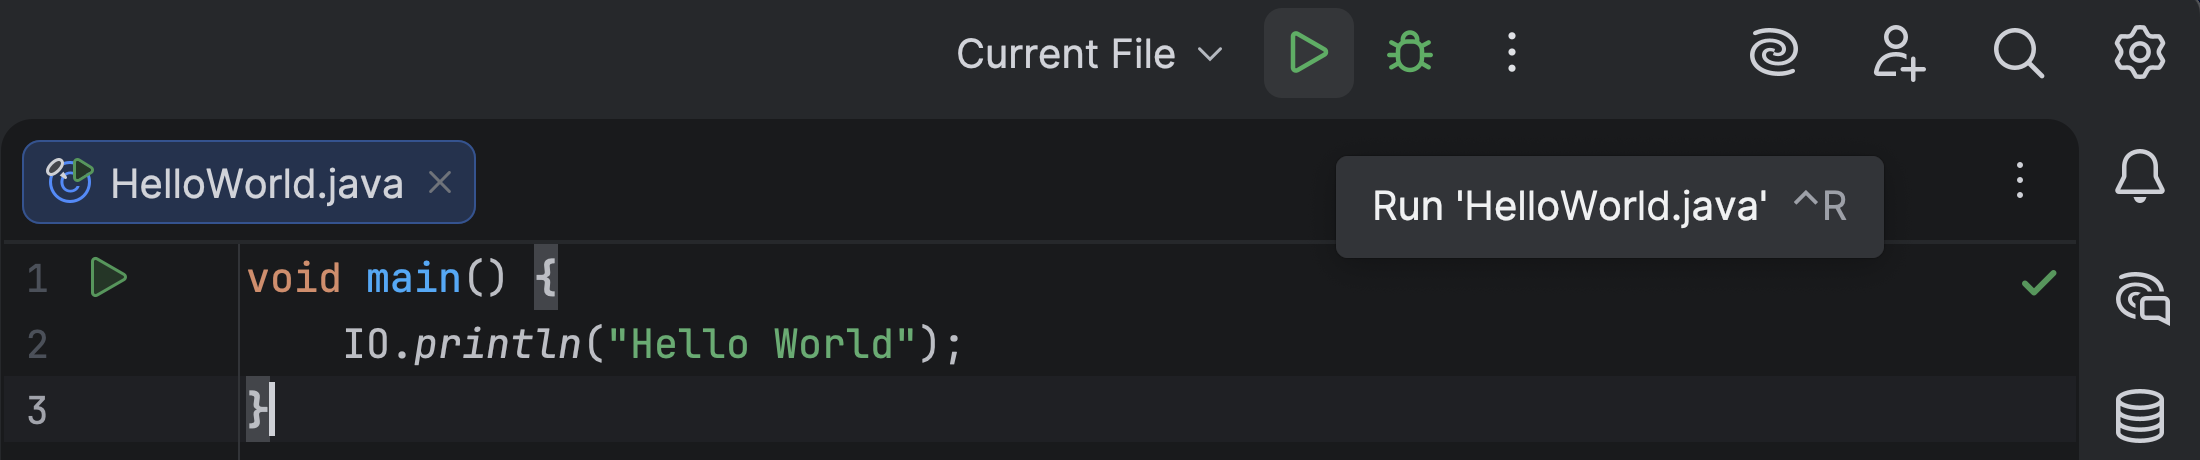
Let's add some code. As of Java 25, it is even easier to get started with writing Java code. You can create a compact source file.
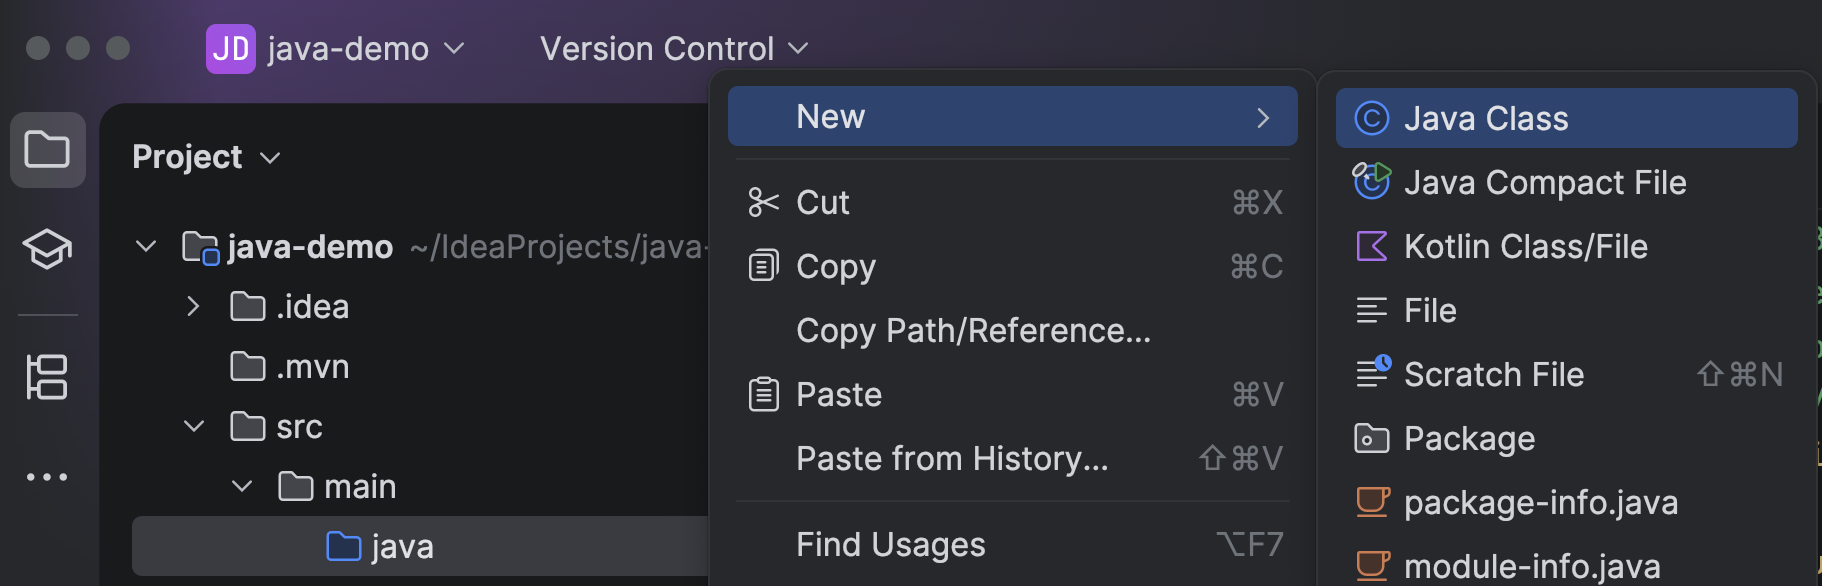
- In the Project tool window on the left, select the directory
src/main/java. - To add a new compact source file, right-click the Project tool window to open the context menu and select New | Java Compact File.
- Name this file
HelloWorld.
Note: If you are using a version of Java older than 25, you will not have the option to create a compact source file. You will need to create a Java class. Select New | Java Class instead.
IDE TIP
You can add a new Java file using the shortcut ⌘N (on macOS) or Alt+Insert (on Windows/Linux) on the intended directory in the Project tool window.
The entrypoint to execute a Java program is the main method.
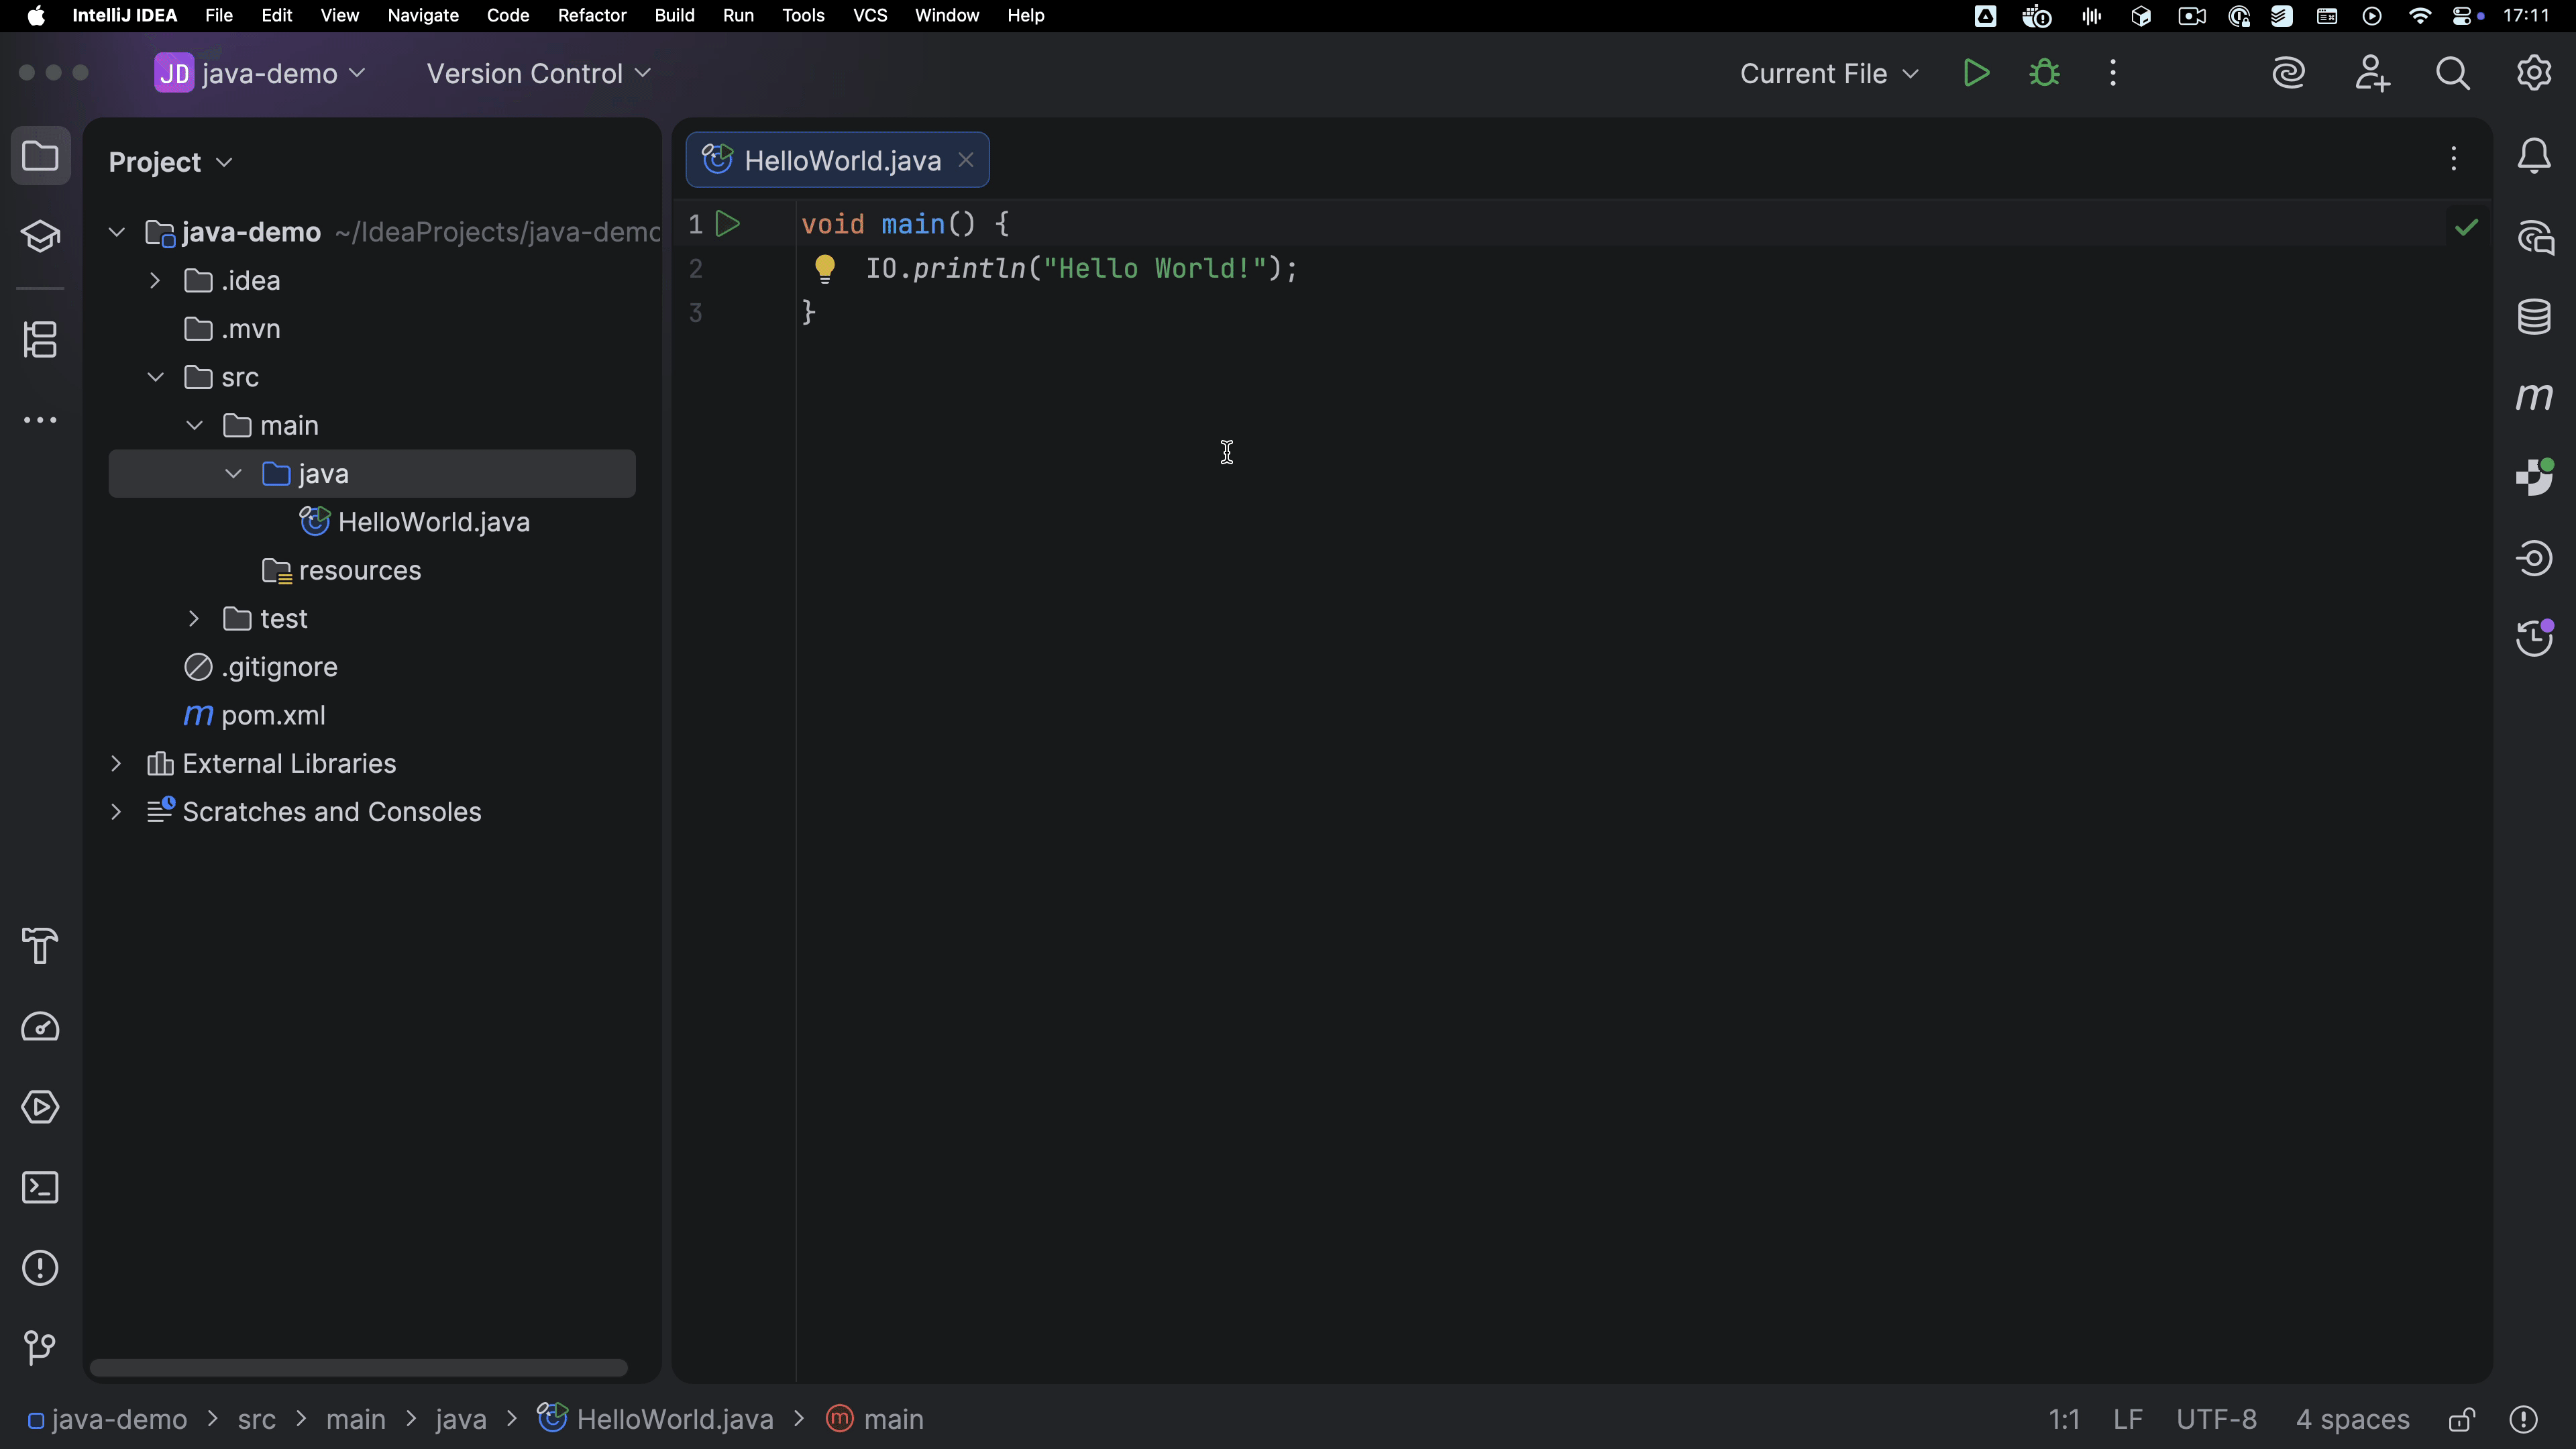
If you have created a compact source file, IntelliJ IDEA will have added this main method for you. It should look like this:
To keep things simple, let's make the program print Hello World! to the console and move the cursor to a new line, by adding IO.println("Hello World!"); to the method body:
I recommend that you type the code rather than copy-pasting, as that will help you get more familiar with the syntax.
As you start typing, you'll notice that IntelliJ IDEA gives you code completion. It will help you complete the names of classes, methods, fields, and keywords, and other types of completion. Use the arrow keys to select the option you want from the list, and the Return (on macOS) or Enter (on Windows/Linux) key to apply your selection.
As you learn more about Java, you can expand your code. For example, convert your compact source file to a class. IntelliJ IDEA has inspections and quick-fixes to help you with this.
To convert the compact source file to a class, place your cursor on the main method and press Alt+Enter. From the list of options, select Convert into a regular class. IntelliJ IDEA will convert the compact source file to a class.
Alternatively, you can use command completion to perform relevant commands in the editor. Type two dots .. after the main method and select the option Convert into a regular class.
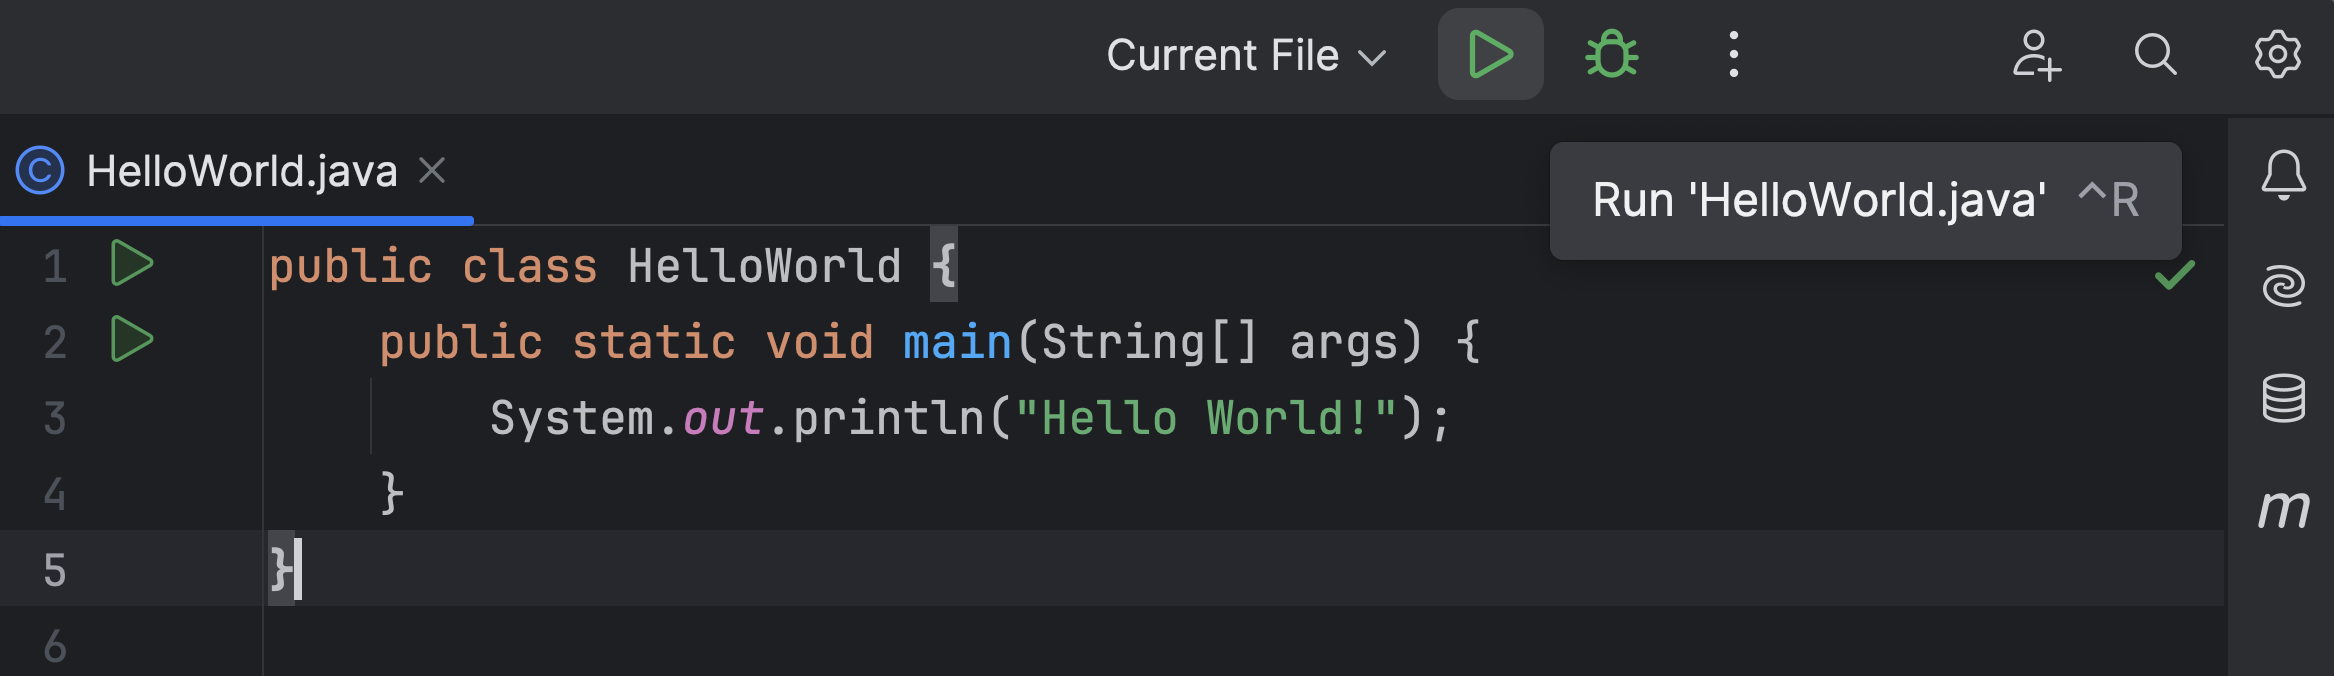
Note: If you have created a Java class, IntelliJ IDEA will have created a file with a class declaration. You will need to add the main method yourself. To print to the console, add System.out.println("Hello World!"); to the method body.
The classic Java HelloWorld program looks like this:
IntelliJ IDEA will show you if you've typed or selected something that doesn't compile or if it sees any other problems. If you press Alt+Enter it will offer options to fix the problem. You can use F2 to move to the next problem and Shift+F2 to go to the previous problem. IntelliJ IDEA will help you make sure that your syntax is correct and your code can be compiled by offering suggestions that are context-sensitive. Alt+Enter will offer a limited list of suggestions to help fix any problems, while command completion (..) will offer all commands that are relevant to the current context.
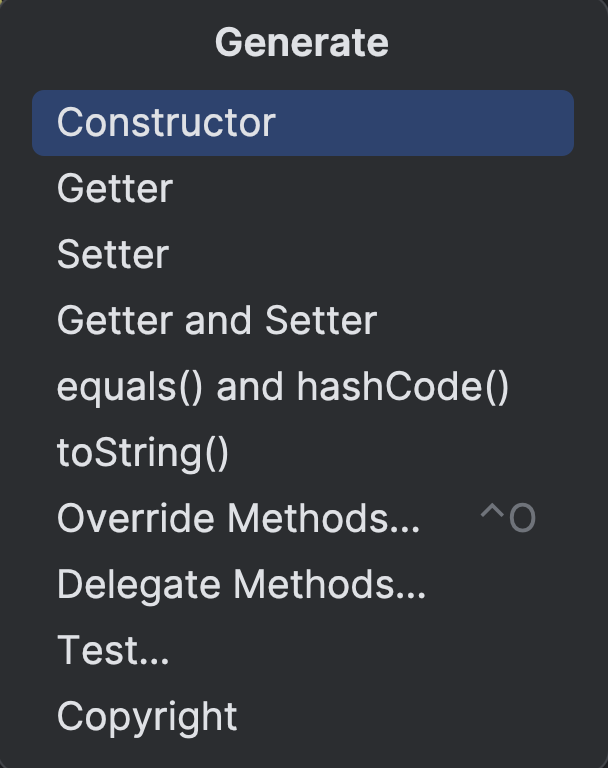
To speed up development, you can also generate code. IntelliJ IDEA can generate constructors, getters and setters, toString(), equals() and hashCode() methods, and more.
IntelliJ IDEA will manage the formatting of your code as you write it. If needed, you can explicitly reformat the code, using the shortcut ⌘⌥L (on macOS) or Ctrl+Alt+L (on Windows/Linux), or by typing .. on an empty line and selecting Reformat Code.
Running your application
A major benefit of using an IDE is that you can directly run your code without having to first manually compile it on the command line.
If you have a compact source file, you can run your HelloWorld application directly from the editor, by clicking the green Run button in the gutter near the main method declaration, or by using the shortcut ⌃⇧R (on macOS) or Ctrl+Shift+F10 (on Windows/Linux).
Alternatively, you can run your application using the green Run button in the top right corner or using the shortcut ⌃R (on macOS) or Ctrl+F10 (on Windows/Linux) to run the latest file.
If you have a class, you can run the HelloWorld application by clicking the green Run button in the gutter near the class declaration or the main method declaration.
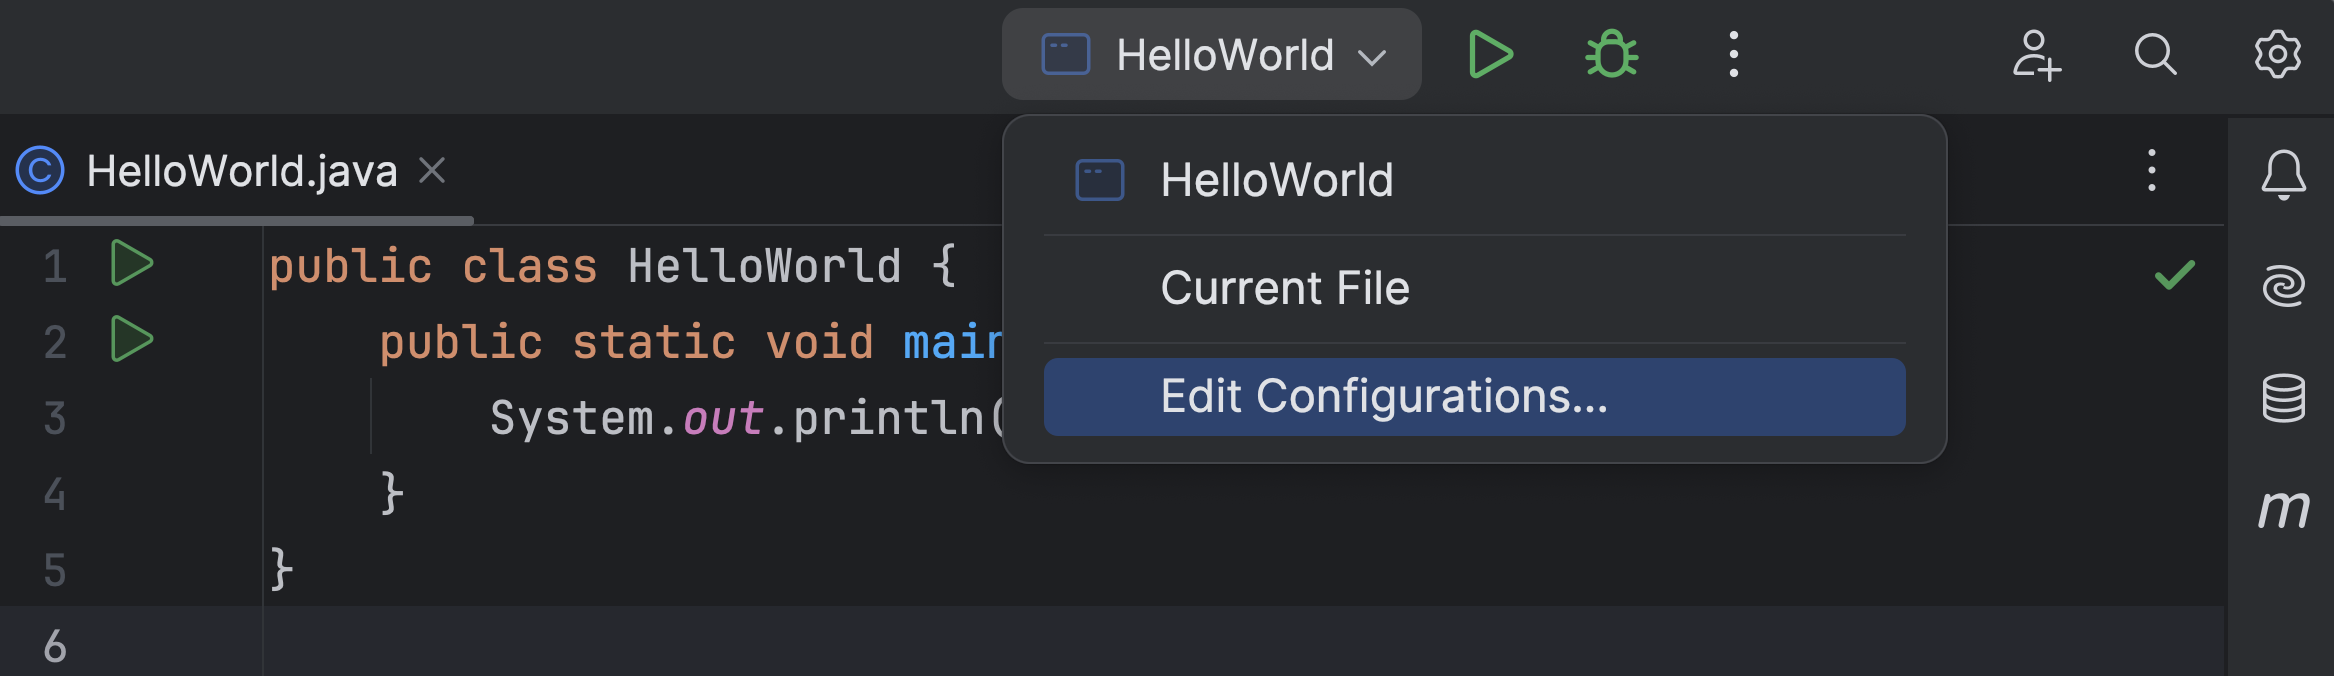
If you want to pass arguments to your application, you can do so in the Run Configurations.
To edit your run configurations, select the configuration in the run/debug configuration switcher, by clicking the down arrow next to the current configuration or the three dots to the right of the run configuration, and select Edit Configurations.
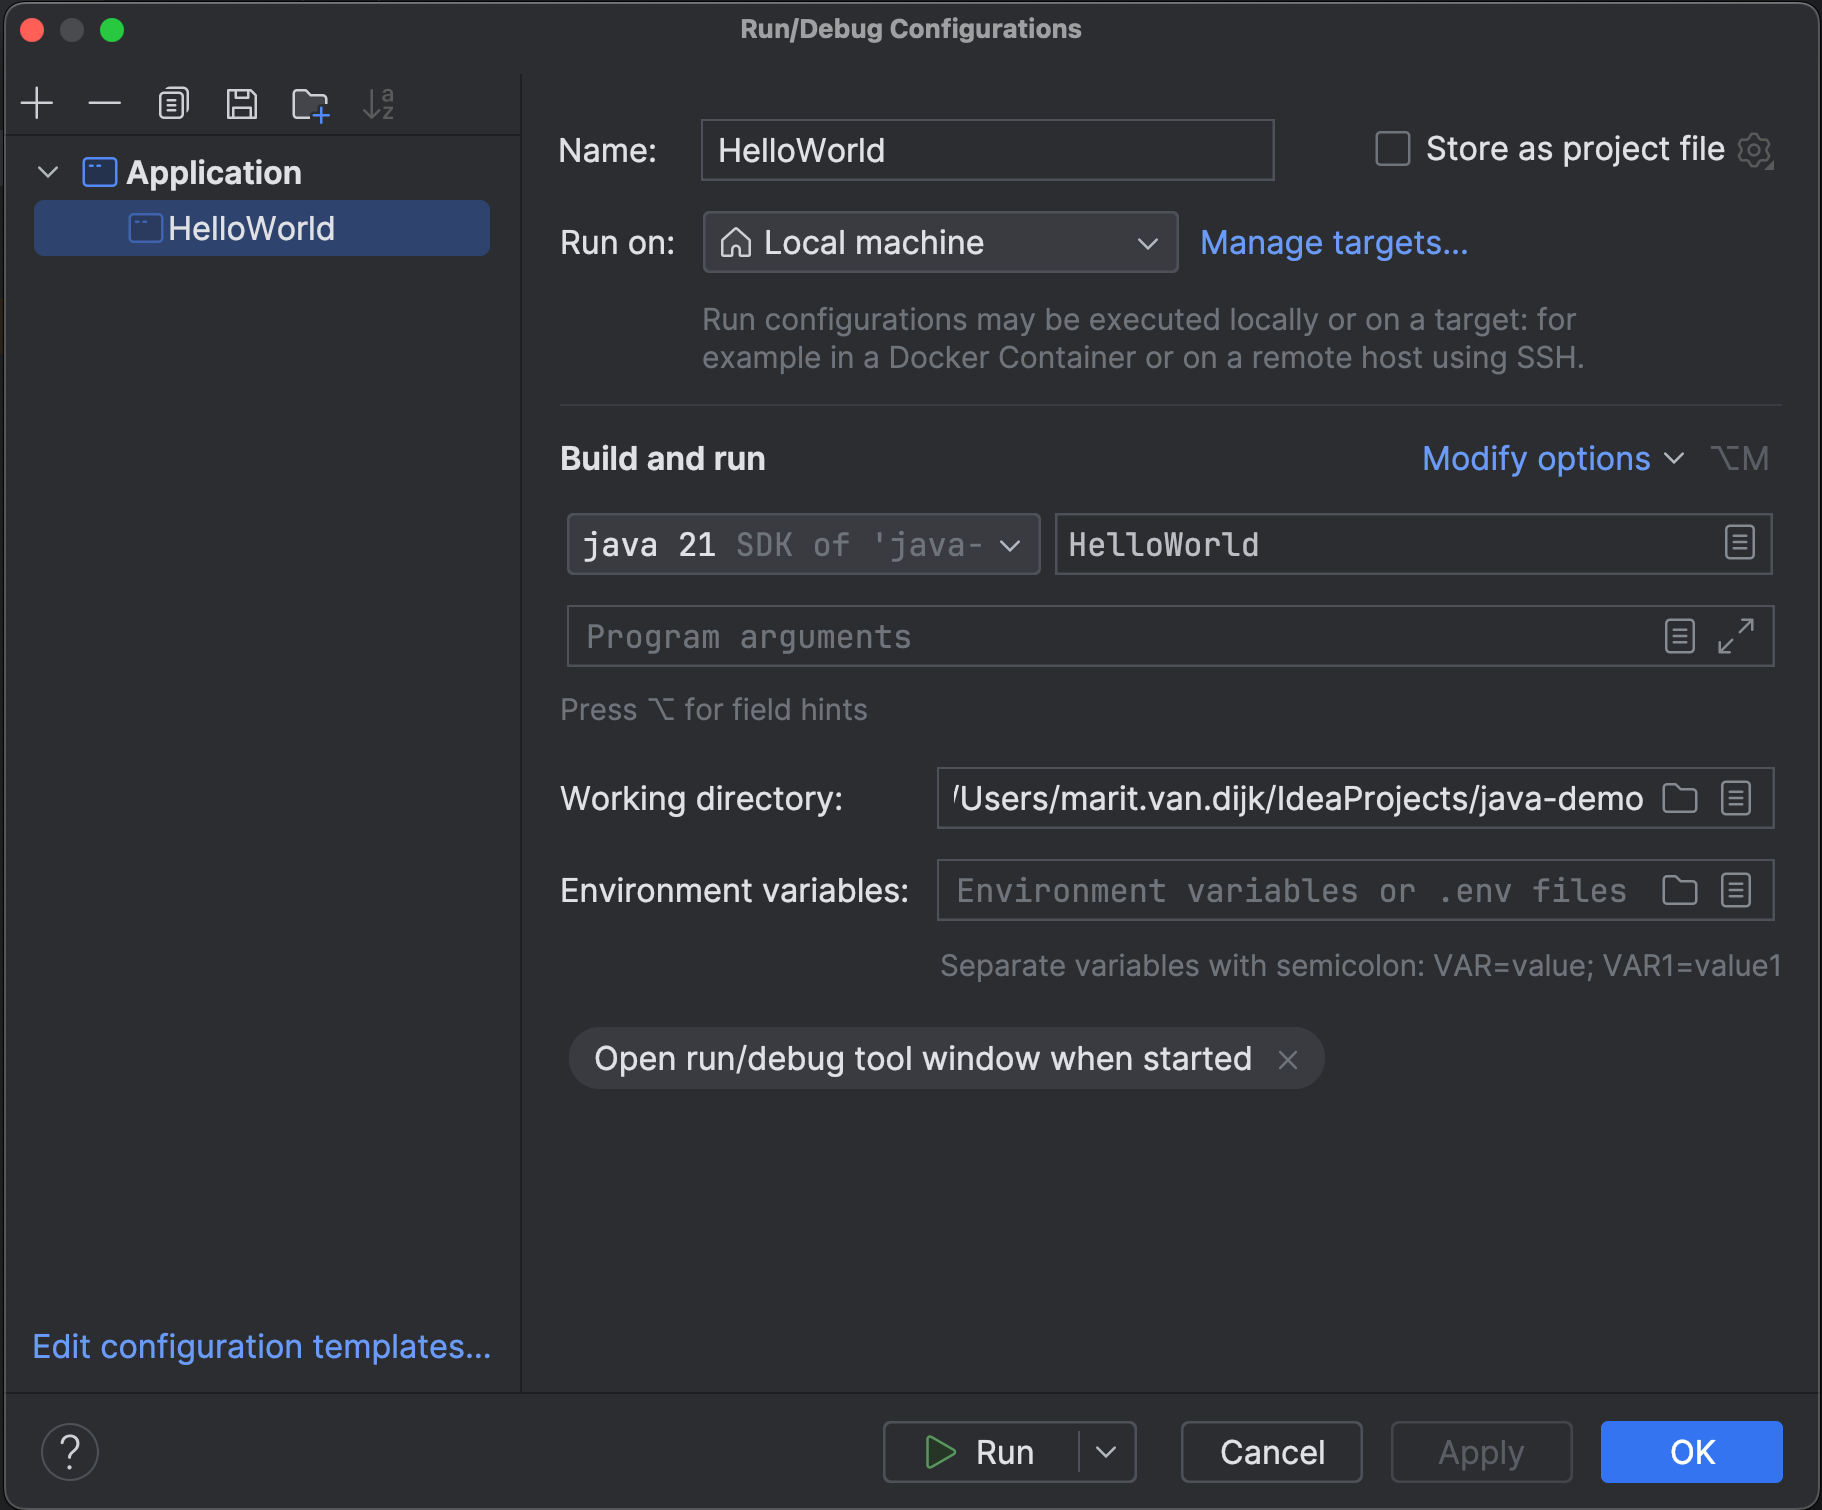
The popup Run/Debug Configurations appears, and there you can modify JVM options, add program arguments, and many more.
Testing
Testing your code helps you to verify that the code does what you expect it to do. You can run your application and test it yourself or add automated tests that can verify your code for you. Thinking about what to test and how can help you to break a problem up into smaller pieces. This will help you get a better solution faster!
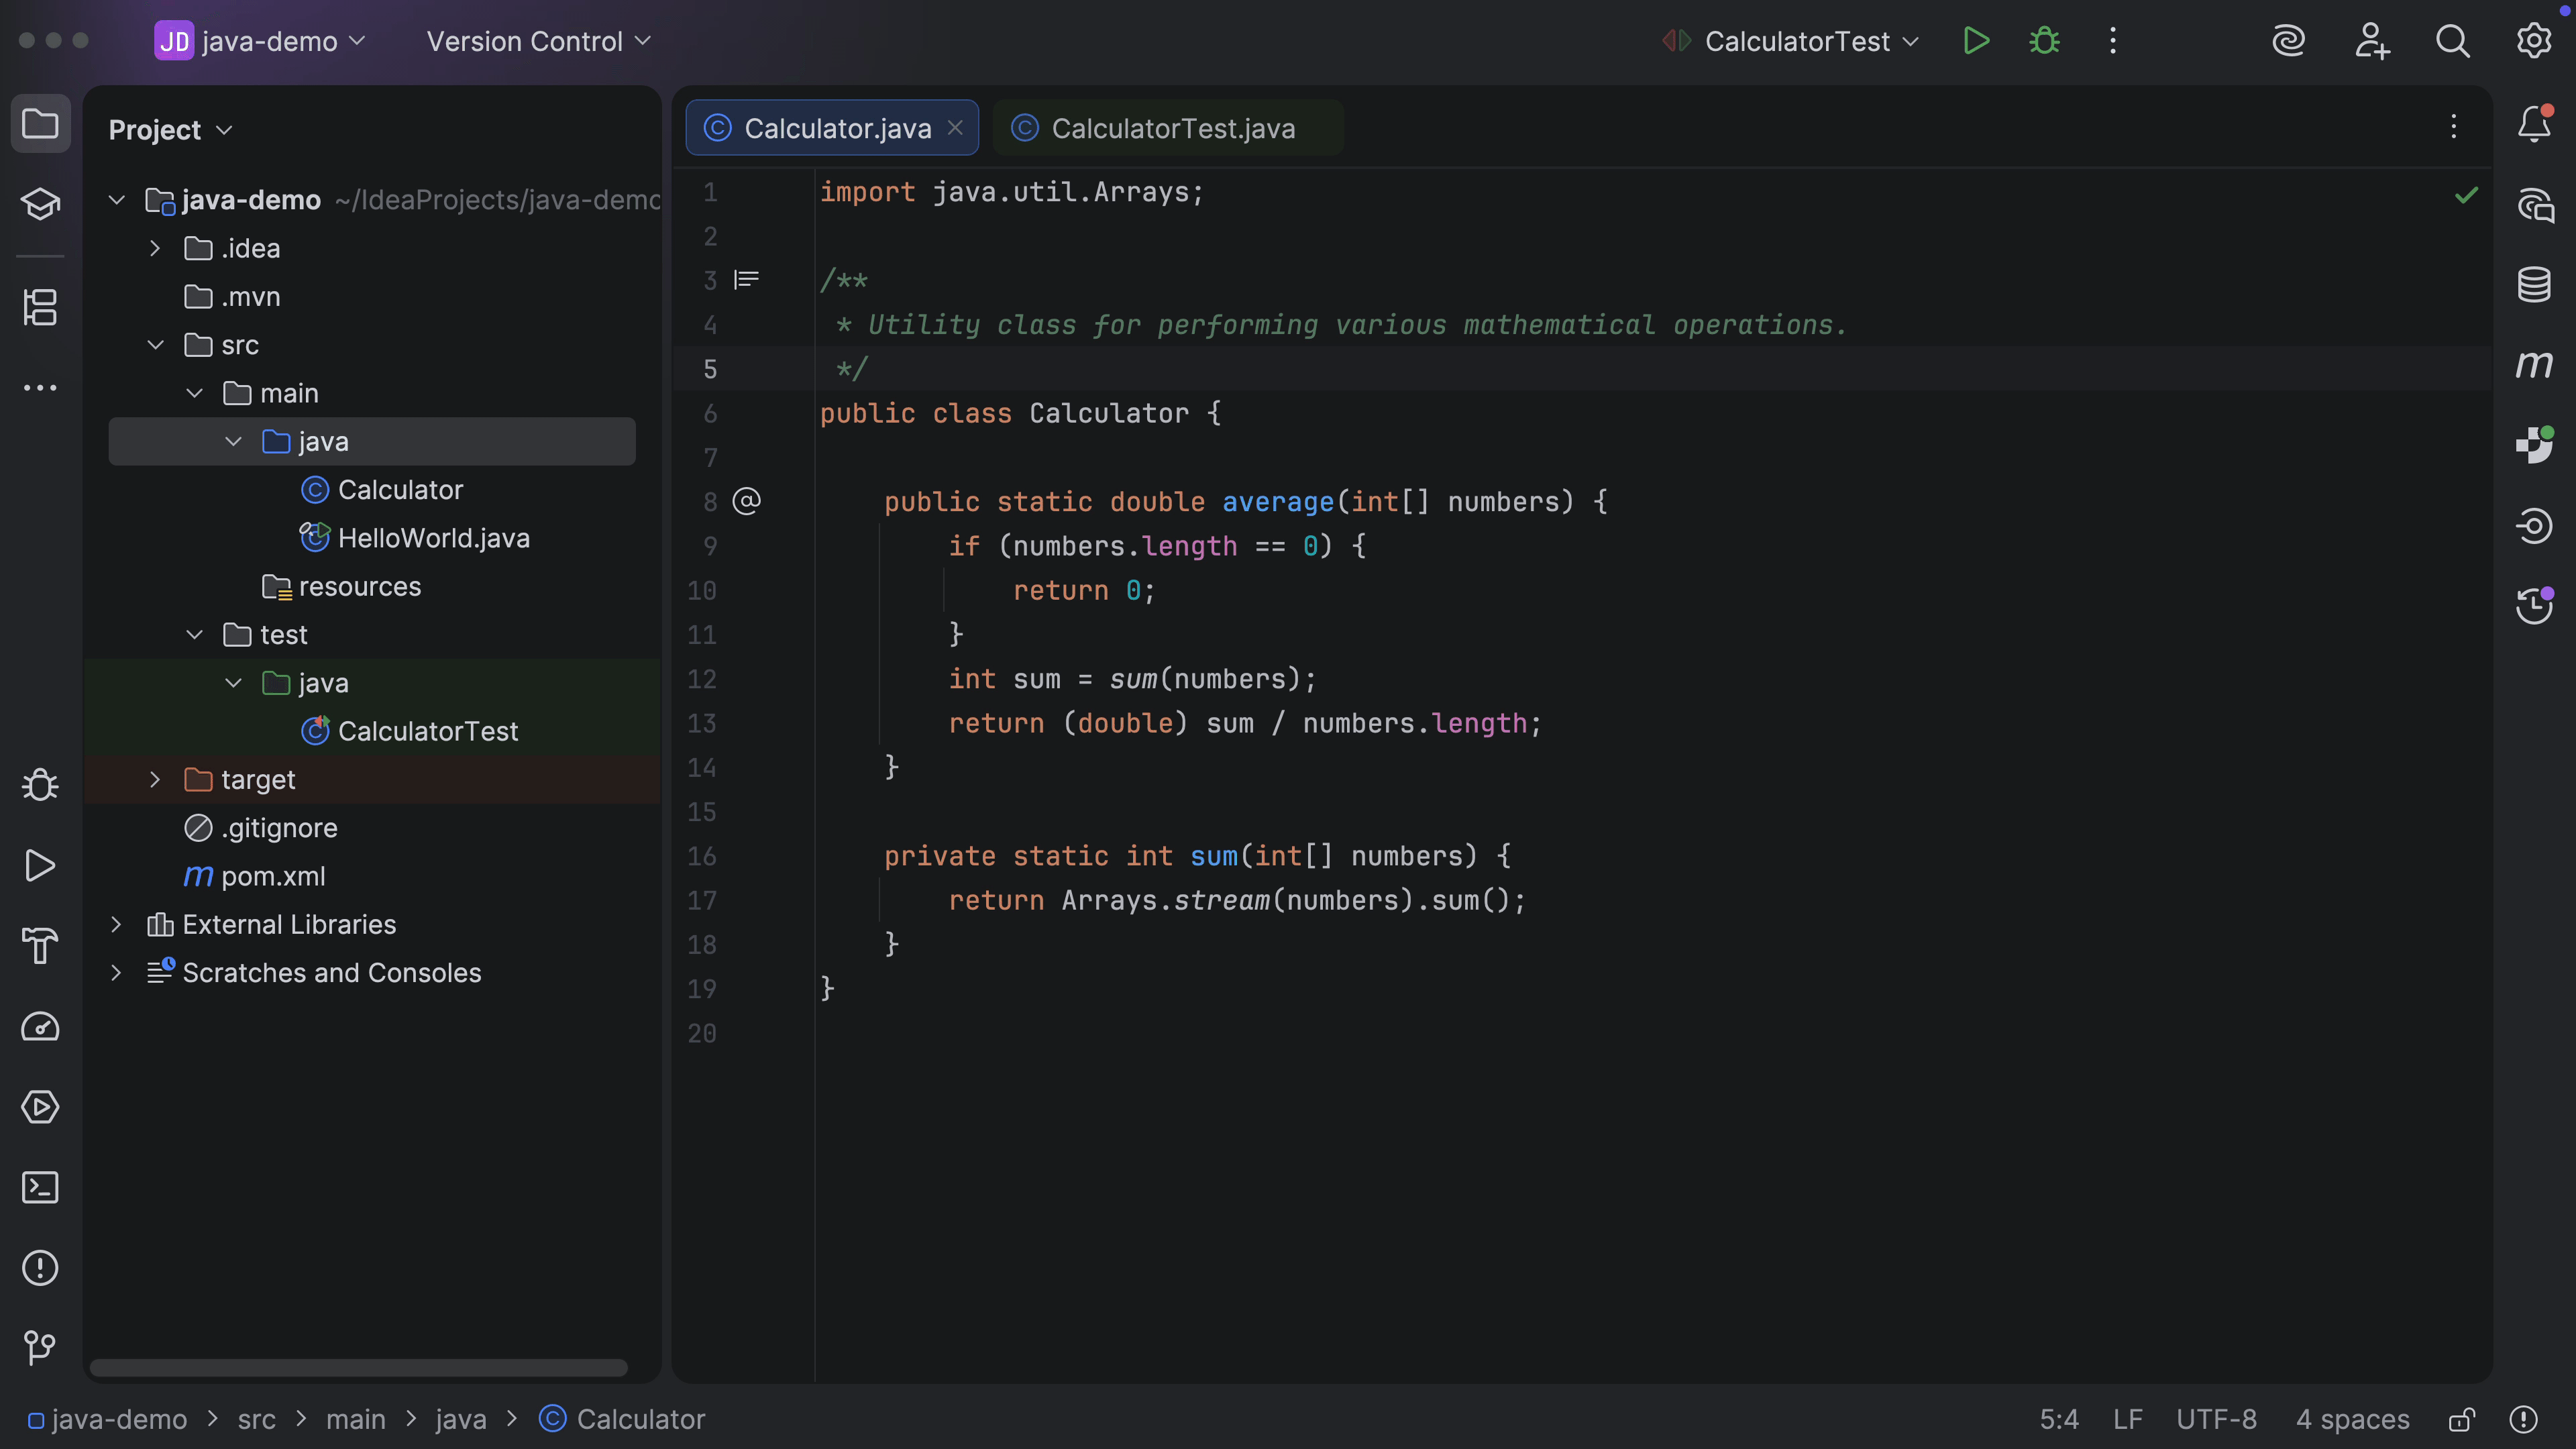
For example, let's say you have a Calculator class containing the following method that calculates the average of a list of values, and you want to make sure the average is calculated correctly:
IntelliJ IDEA makes it easy to add tests to your code. You can navigate to the test for a particular class using the shortcut ⇧⌘T on macOS or Ctrl+Shift+T on Windows/Linux. If no test class exists yet, IntelliJ IDEA will create one for you. This class will be created in the src/test/java directory.
You can select a Testing library in the Create test popup.
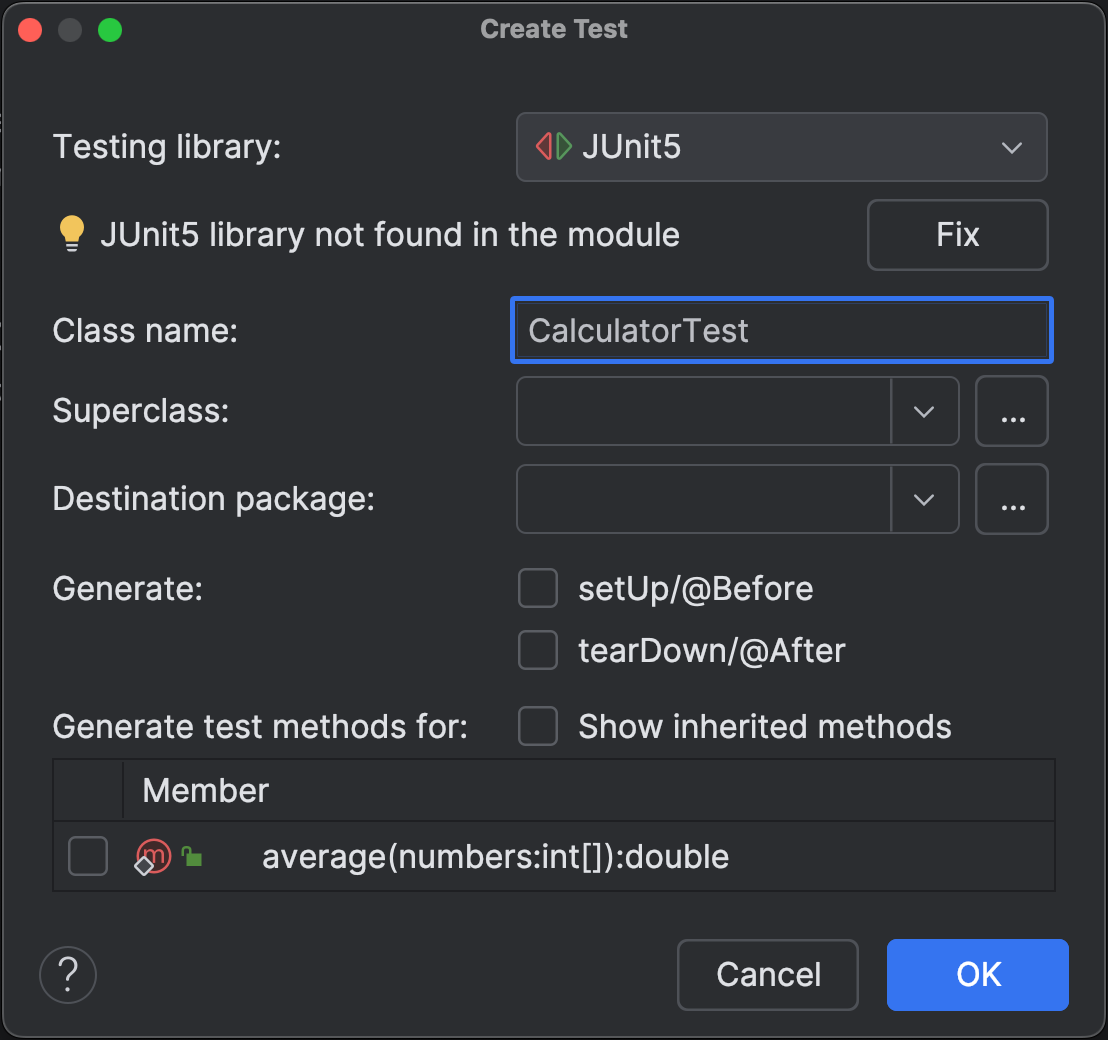
IntelliJ IDEA supports multiple testing libraries, including JUnit 5, which is the most used testing library for Java developers. If JUnit 5 is not part of your project yet, IntelliJ IDEA will note “JUnit5 library not found in the module.” Click Fix to have IntelliJ IDEA fix this for you. IntelliJ IDEA supports the latest frameworks and libraries that developers need. If you want to use JUnit 6, the latest version of JUnit, open the dropdown for Testing library and select JUnit 6.
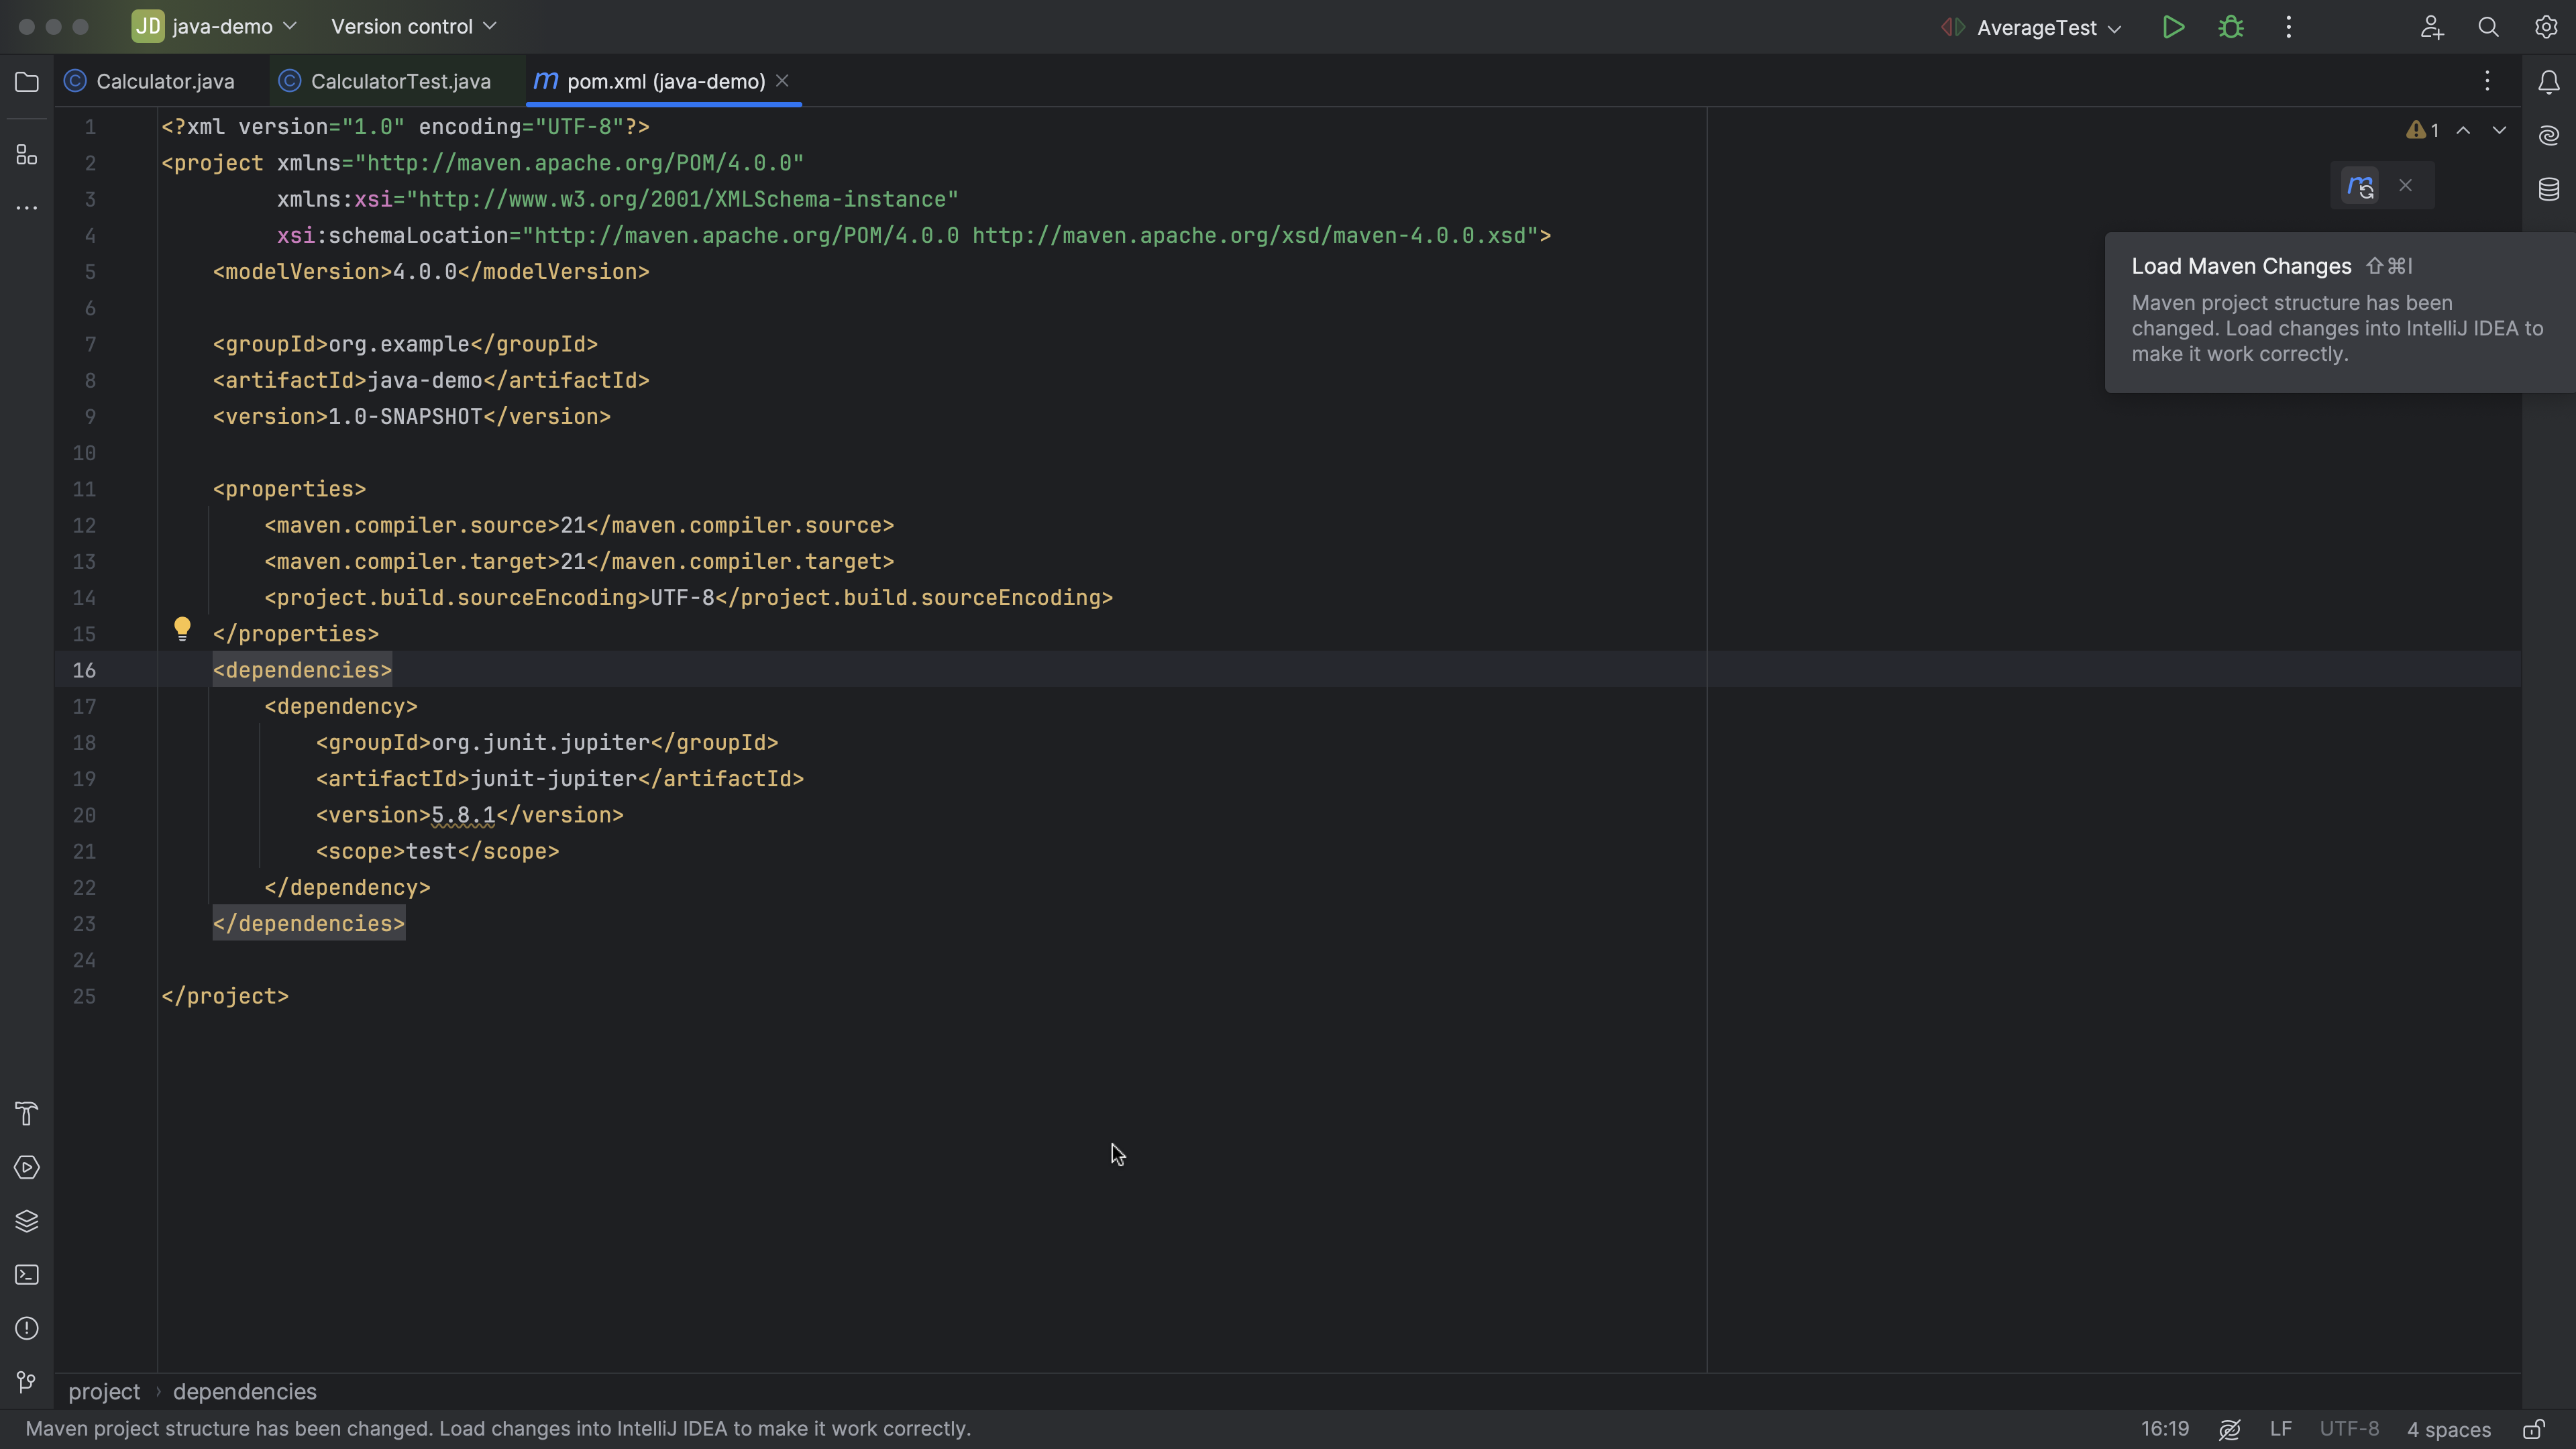
If you are using Maven as your build system, note that the JUnit dependency junit-jupiter is added to the pom.xml in the <dependencies> section.
To make sure the dependencies work correctly in your project, Load Maven Changes by clicking the popup in the top right corner or using the shortcut ⇧⌘I (on macOS) or Ctrl+Shift+O (on Windows/Linux).
Go back to the test file to add tests. IntelliJ IDEA can help generate a test. In the test class, use Generate (⌘N on macOS or Alt+Insert on Windows/Linux) and select Test Method to add a test. Give the test a name that explains the intended behavior and add the relevant test code.
For example, let's make sure that the method average() correctly calculates the average for an array of positive numbers, and returns 0 for an empty array. You might want to add additional tests for different scenarios, such as an array of negative numbers, a mix of positive and negative numbers, etc.
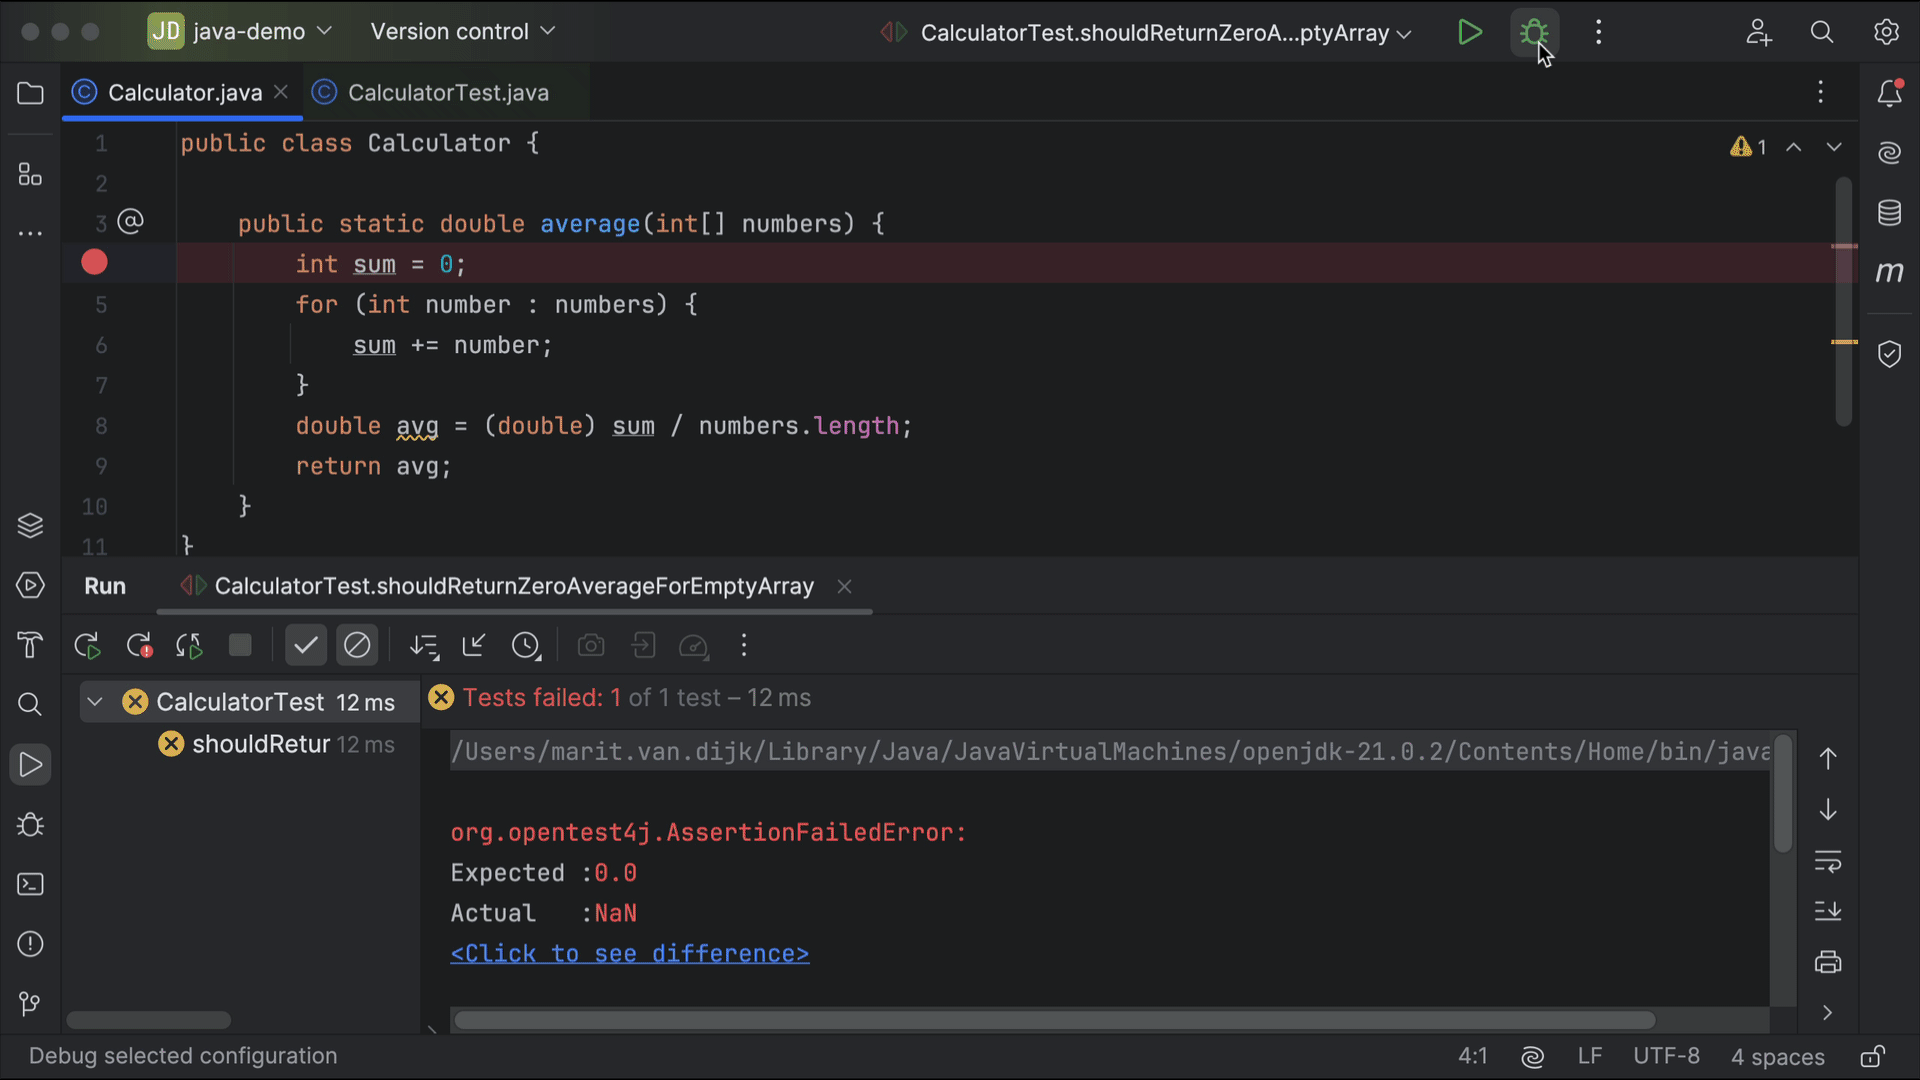
In the test class, you can select Run All Tests (⌃⇧R on macOS or Ctrl+Shift+F10 on Windows/Linux).
In this example, the second test fails. The test expected to get the value 0 as the average of an empty array, but got NaN (not a number) instead. Let's find out why, using the debugger.
Debugging
You might want to see how your code runs, either to help you understand how it works and/or when you need to fix a bug or failing test, like the one above. You can run your code through the debugger to see the state of your variables at different times and the call stack - the order in which methods are called when the program executes. To do so, you must first add a breakpoint to the code.
To add a breakpoint, click the gutter at the line of code where you want execution to stop. Alternatively, place the caret at the line and press ⌘F8 (on macOS) or Ctrl+F8 (on Windows/Linux). You can run your test or application using the Debug option; either by right-clicking the Run button in the gutter and selecting the Debug option from the list, or by selecting the Debug button at the top right.
Execution will stop at the breakpoint, so you can investigate the state of your application. You can see the current values of variables and objects. It is possible to evaluate an expression to see its current value and look at more details. You can even change the expressions to evaluate different results. Continue execution by either stepping into a method to see what happens inside a called method (using the shortcut F7, or the corresponding button in the Debug tool window) or stepping over a line to go to the next line even if a method is called (using the shortcut F8, or the corresponding button in the Debug tool window), depending on what you're interested in. Finally, you can resume the program to finish the execution of the test.
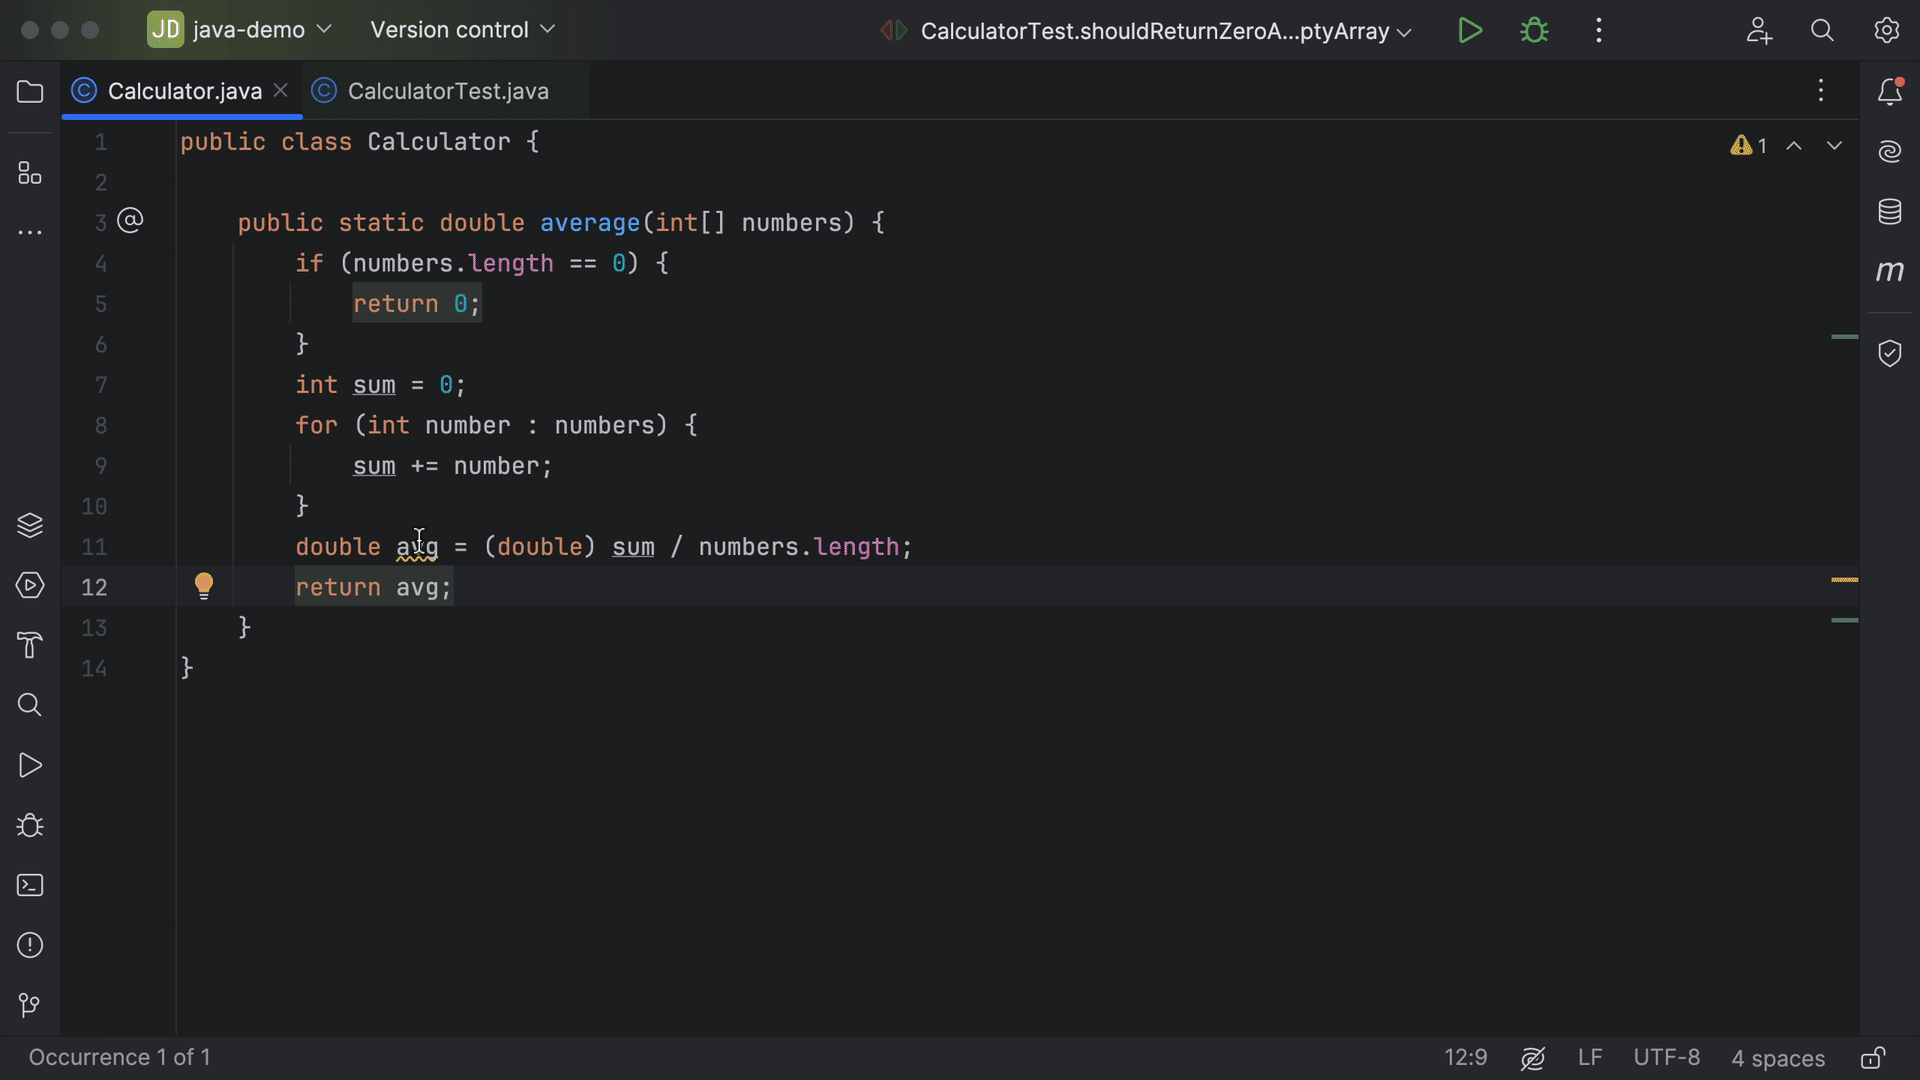
Let's debug the failing test from the previous section. In the code, place a breakpoint on line 4. Run the failing test through the debugger. Step over the code until you get to line 8 and observe the values of the variables. When you get to line 8, select sum / numbers.length, right-click to open the context menu and select Evaluate Expression. Press Enter to evaluate the selected expression. You see that sum / numbers.length results in a java.lang.ArithmeticException: / by zero. The empty array has a length of 0 and Java does not allow dividing by zero.
When you evaluate (double) sum / numbers.length the result is NaN. The test expected 0, so it fails.
This scenario was not considered in the initial implementation. You can fix this by changing the method to return 0 when an empty array is given as input:
Now, when you run the tests, you see that they pass.
For more information on debugging, see Debugging in Java.
Refactoring code
While working with code, you may want to make small improvements without changing the functionality. You can use refactoring to reshape the code.
IntelliJ IDEA provides a number of ways to help you refactor your code.
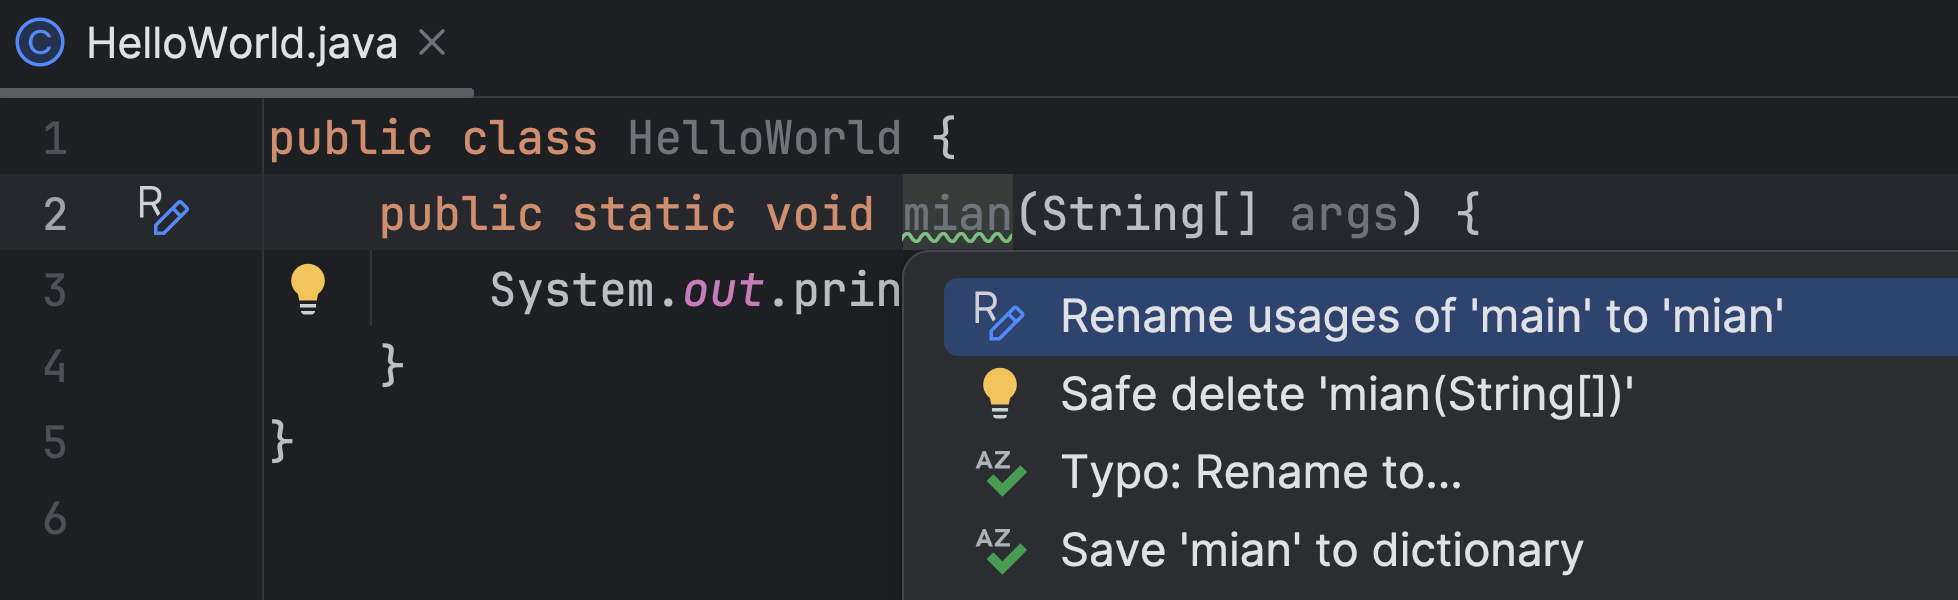
Command completion offers relevant commands in your editor when you type ... For example, to rename a variable or method, type .. after the variable or method name and select Rename.
Alternatively, you can use shortcuts for specific refactoring options. For example:
- Rename classes, variables, and methods using Refactor | Rename (⇧F6 on macOS, or Shift+F6 on Windows/Linux).
- Inline variables (⌘⌥N on macOS, or Ctrl+Alt+N on Windows/Linux), or extract variables (⌘⌥V on macOS, or Ctrl+Alt+V on Windows/Linux) as needed.
- Break long methods into smaller parts by extracting a method (⌘⌥M on macOS, or Ctrl+Alt+M on Windows/Linux) and giving it a meaningful name.
Finally, you can use Alt+Enter or command completion to invoke ways to refactor and transform your code.
Pull up the refactoring menu to see what is possible, using the shortcut ⌃T (on macOS) or Ctrl+Alt+Shift+T (on Windows/Linux).
All these options help you refactor your code to a more familiar style or to use new idioms and language features.
Don't forget to rerun your tests after refactoring to make sure that your code still works as expected!
Documenting code
You can add documentation to your code. IntelliJ IDEA provides completion for documentation comments, which is enabled by default. Type /** before a declaration and press Enter. IntelliJ IDEA auto-completes the documentation comment for you.
IntelliJ IDEA provides a way for you to easily understand and read Javadoc comments by selecting Reader Mode. Toggle Rendered View in the editor using ^⌥Q (on macOS) or Ctrl+Alt+Q (on Windows/Linux). Right-click the icon in the gutter to select Render All Doc Comments if you want all comments to show in reader mode.
If you are using Java 23 or higher, and would like to transform your Javadoc to Markdown, IntelliJ IDEA provides a quick-fix to convert it.
Searching and navigating
IntelliJ IDEA also helps you by providing ways to navigate around a codebase, for example, by going backwards and forwards between files, finding usages and declarations, finding interfaces and their implementations, viewing recently opened files and location, or even opening a window by name.
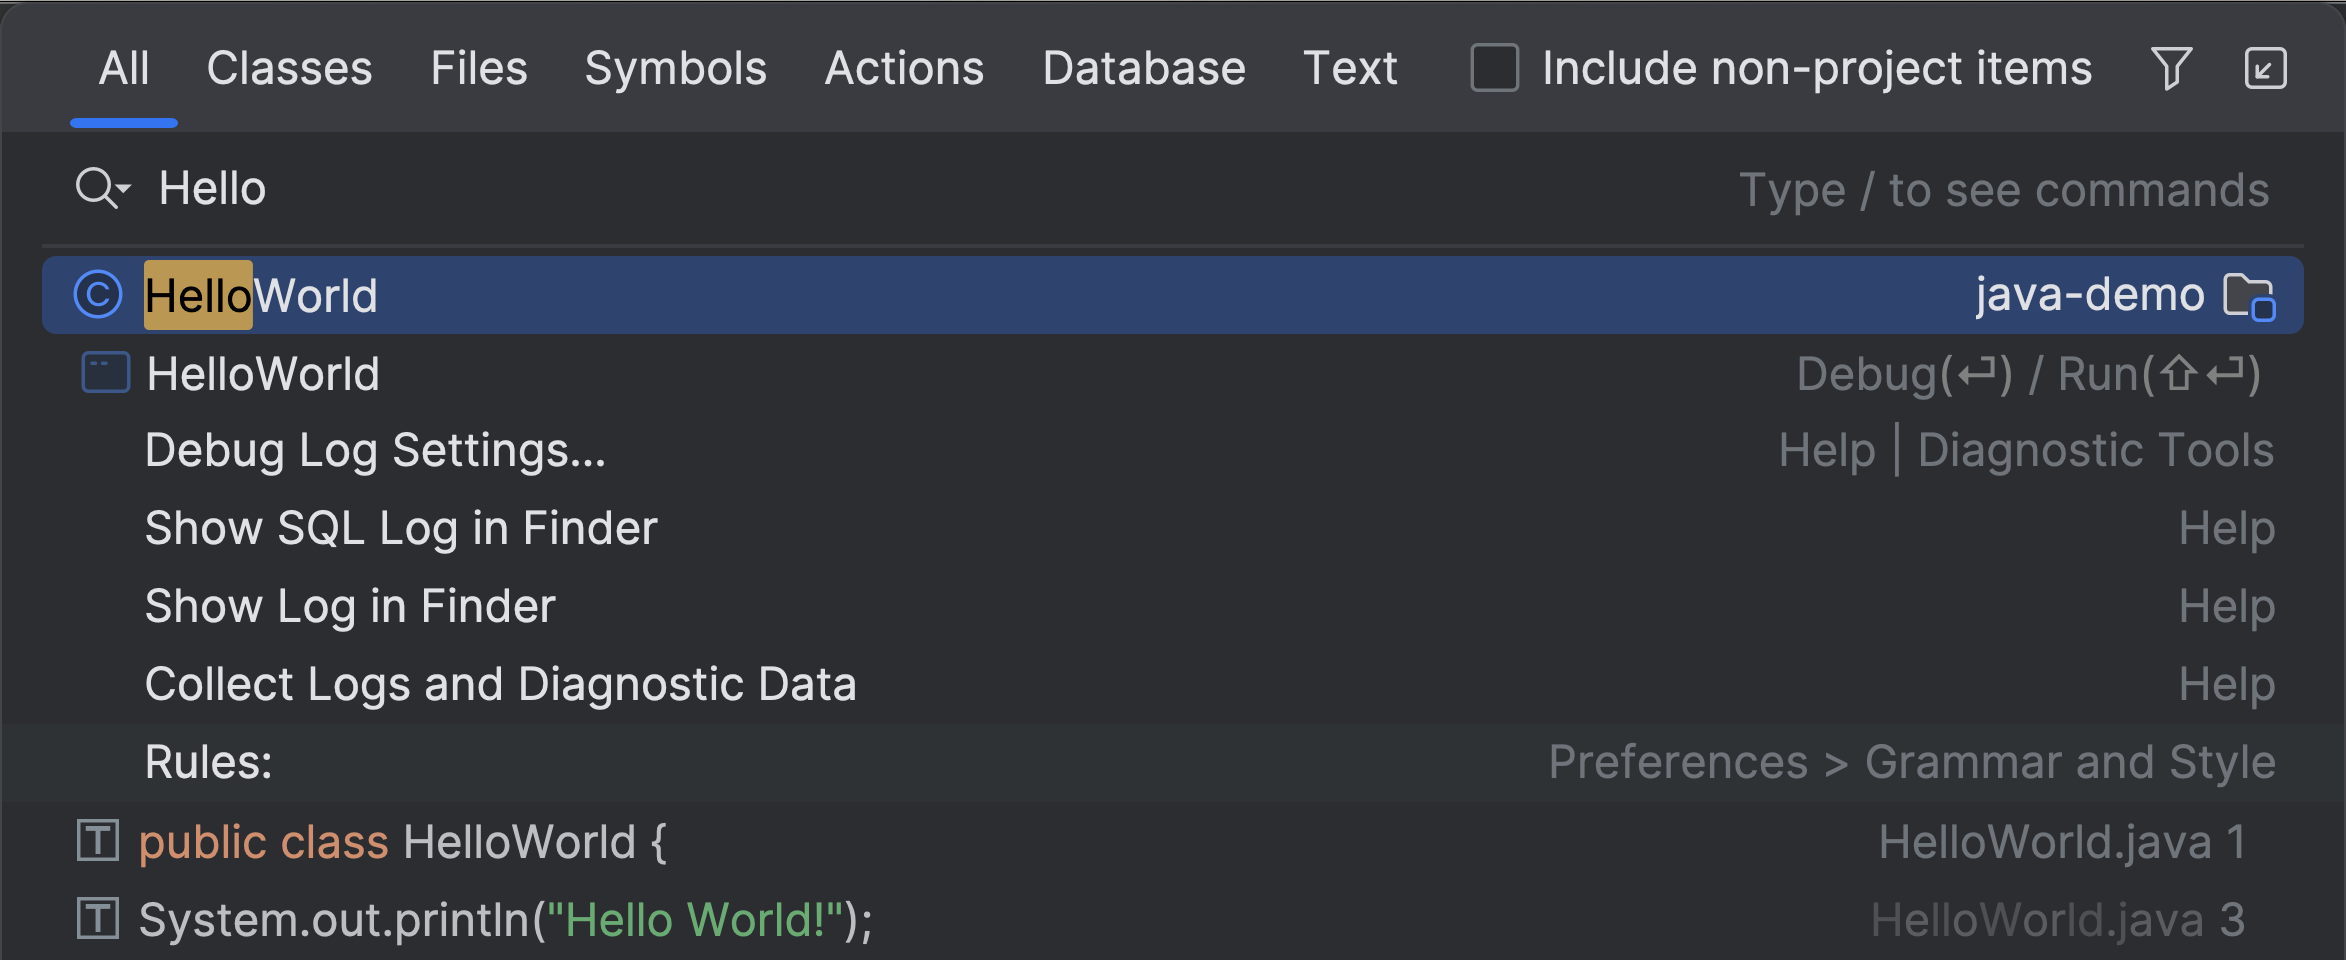
One popular way to search is Search Everywhere (using Shift twice). Search everywhere allows you to search your project files and directories, as well as your project settings and IntelliJ IDEA settings. If you'd like to narrow your search results to Classes, Files, Symbols, Actions, or Text, use the Tab key to navigate to the relevant tab.
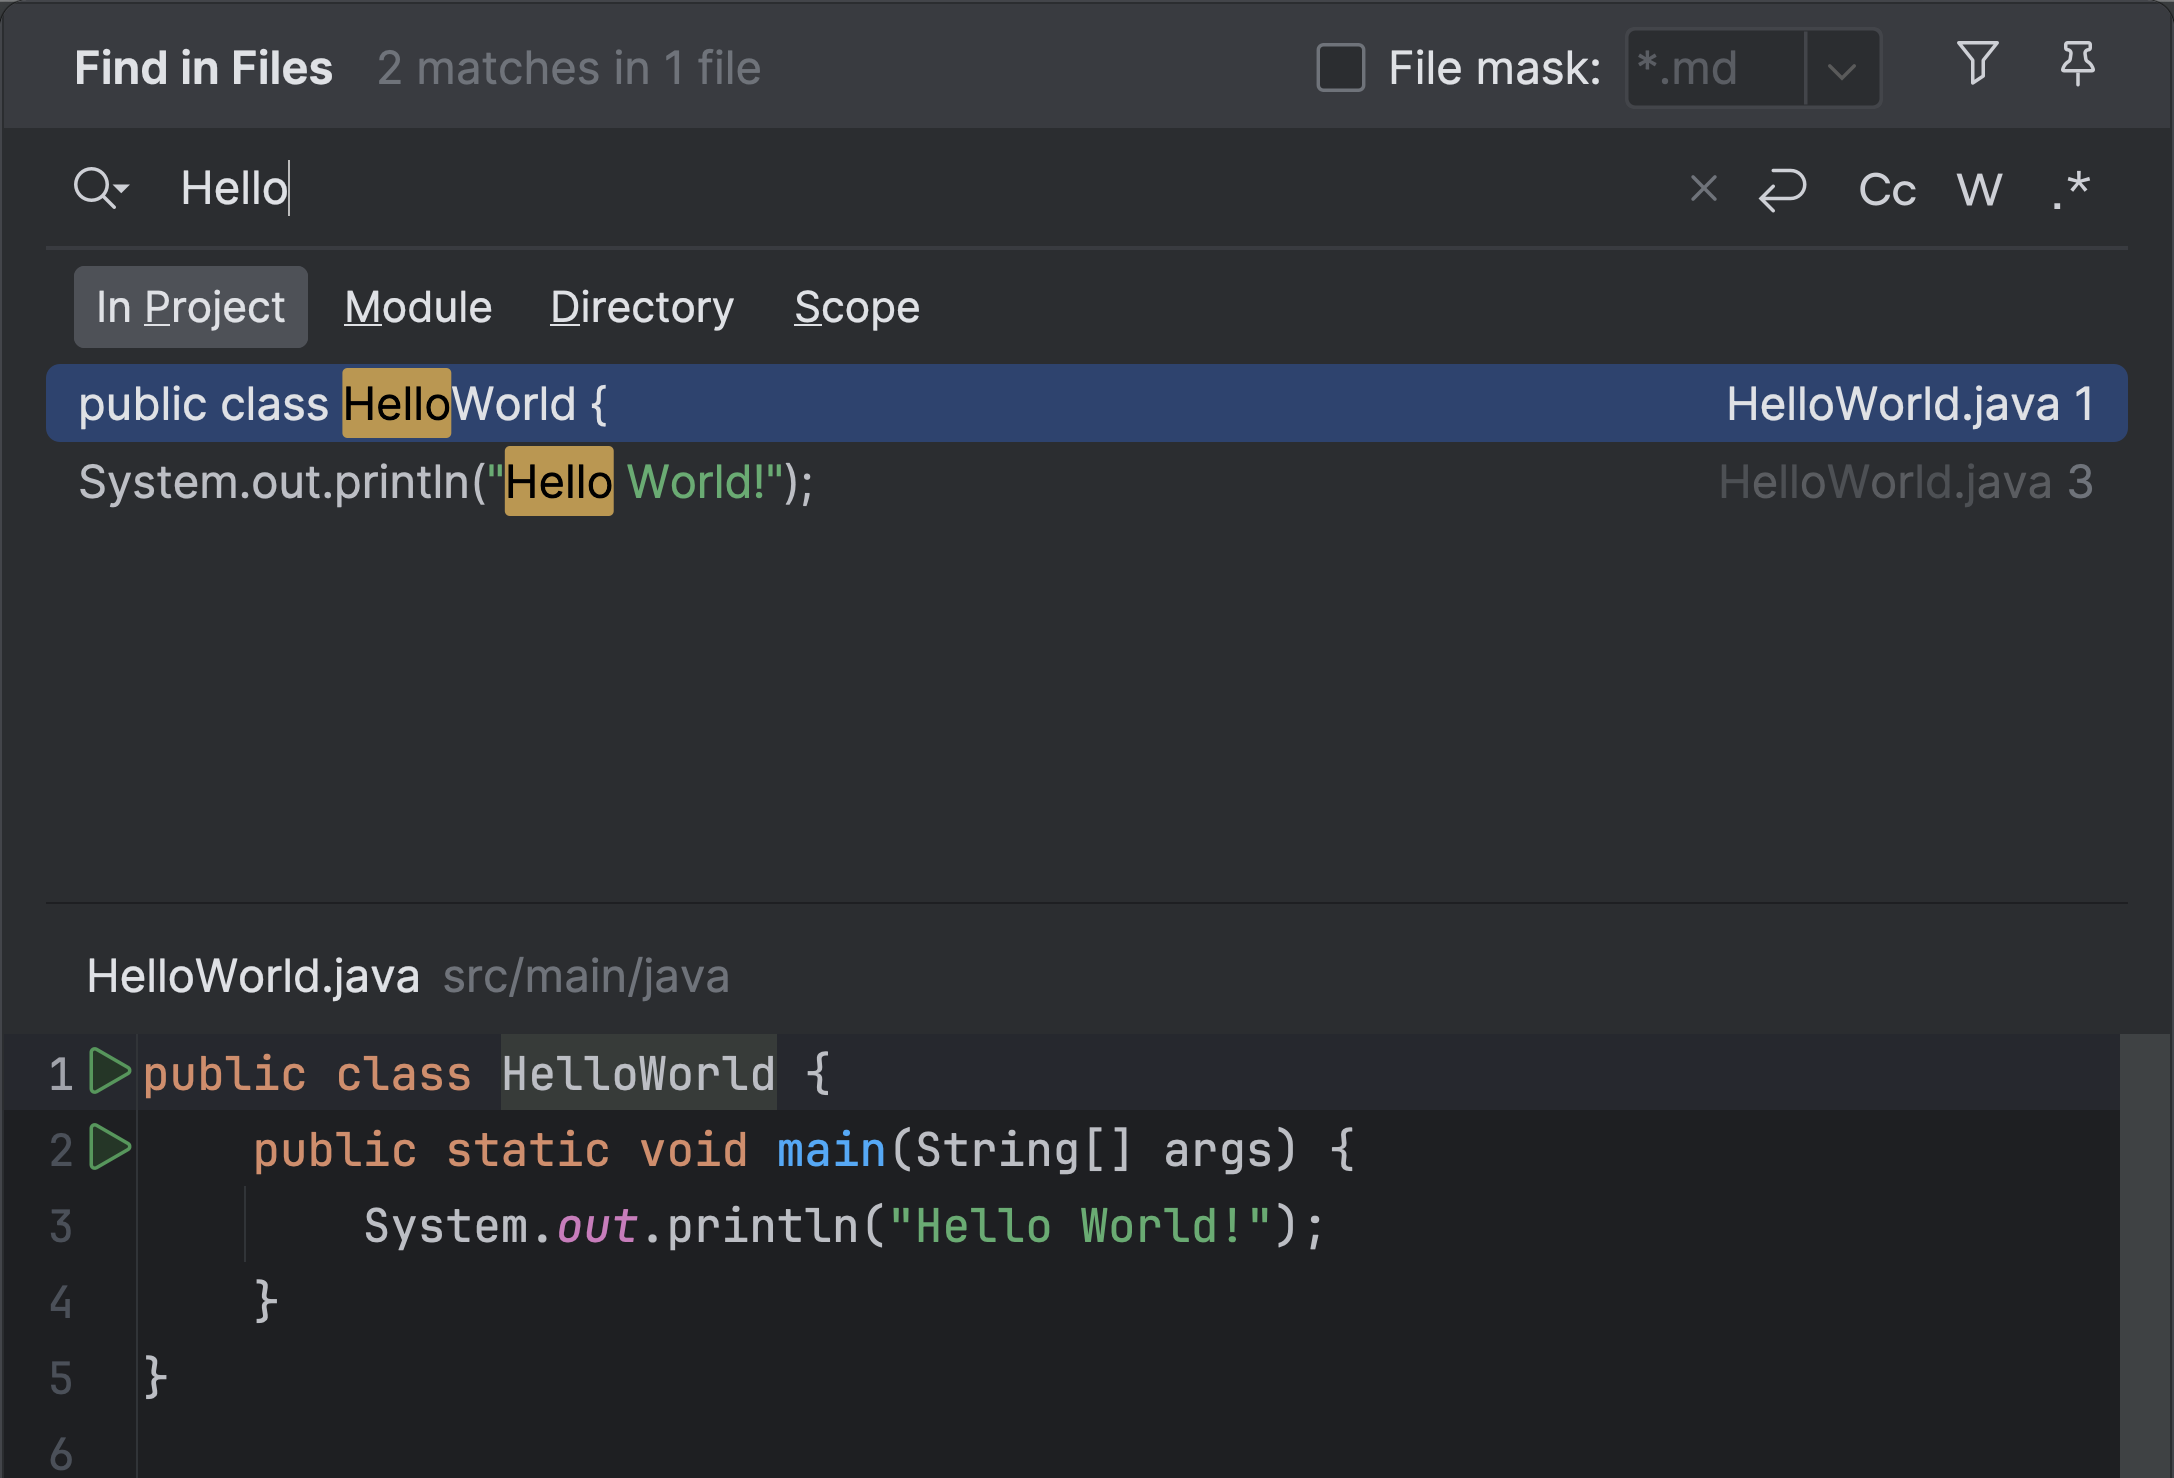
Another popular way to search is Find in Files. Open Find in Files from the main menu using Edit | Find | Find in Files, or by using the shortcut ⌘⇧F (on macOS) or Ctrl+Shift+F (on Windows/Linux). You can narrow down the results from In Project to Module, Directory, or Scope.
Summary
In this article, we've seen how IntelliJ IDEA can help you with code suggestions and completion while writing code, running your application, adding tests and using the debugger to help figure out how code is run, refactoring code, and more.
IntelliJ IDEA continues to improve and evolve, adding new features and offering new integration. You can sharpen your coding skills by taking a look at the documentation, blog, YouTube channel, or guide.
More Learning
Last update: February 2, 2026
Back to Tutorial List